When it comes to running CL commands (CMD) on IBM i, most users still rely on traditional green screen interfaces (5250). While effective for seasoned operators, these interfaces are often complex and unintuitive for users with little or no IBM i experience. Solutions now exist to modernize, simplify and enhance the user experience.
With NTi and its Toolbox extension, available as a NuGet package, it is possible to query the IBM-provided QCDRCMDD system API directly, to automatically retrieve the full definition of any CL command.
The RetrieveCommandDefinition() method fully encapsulates this operation, automatically handling:
- The API call
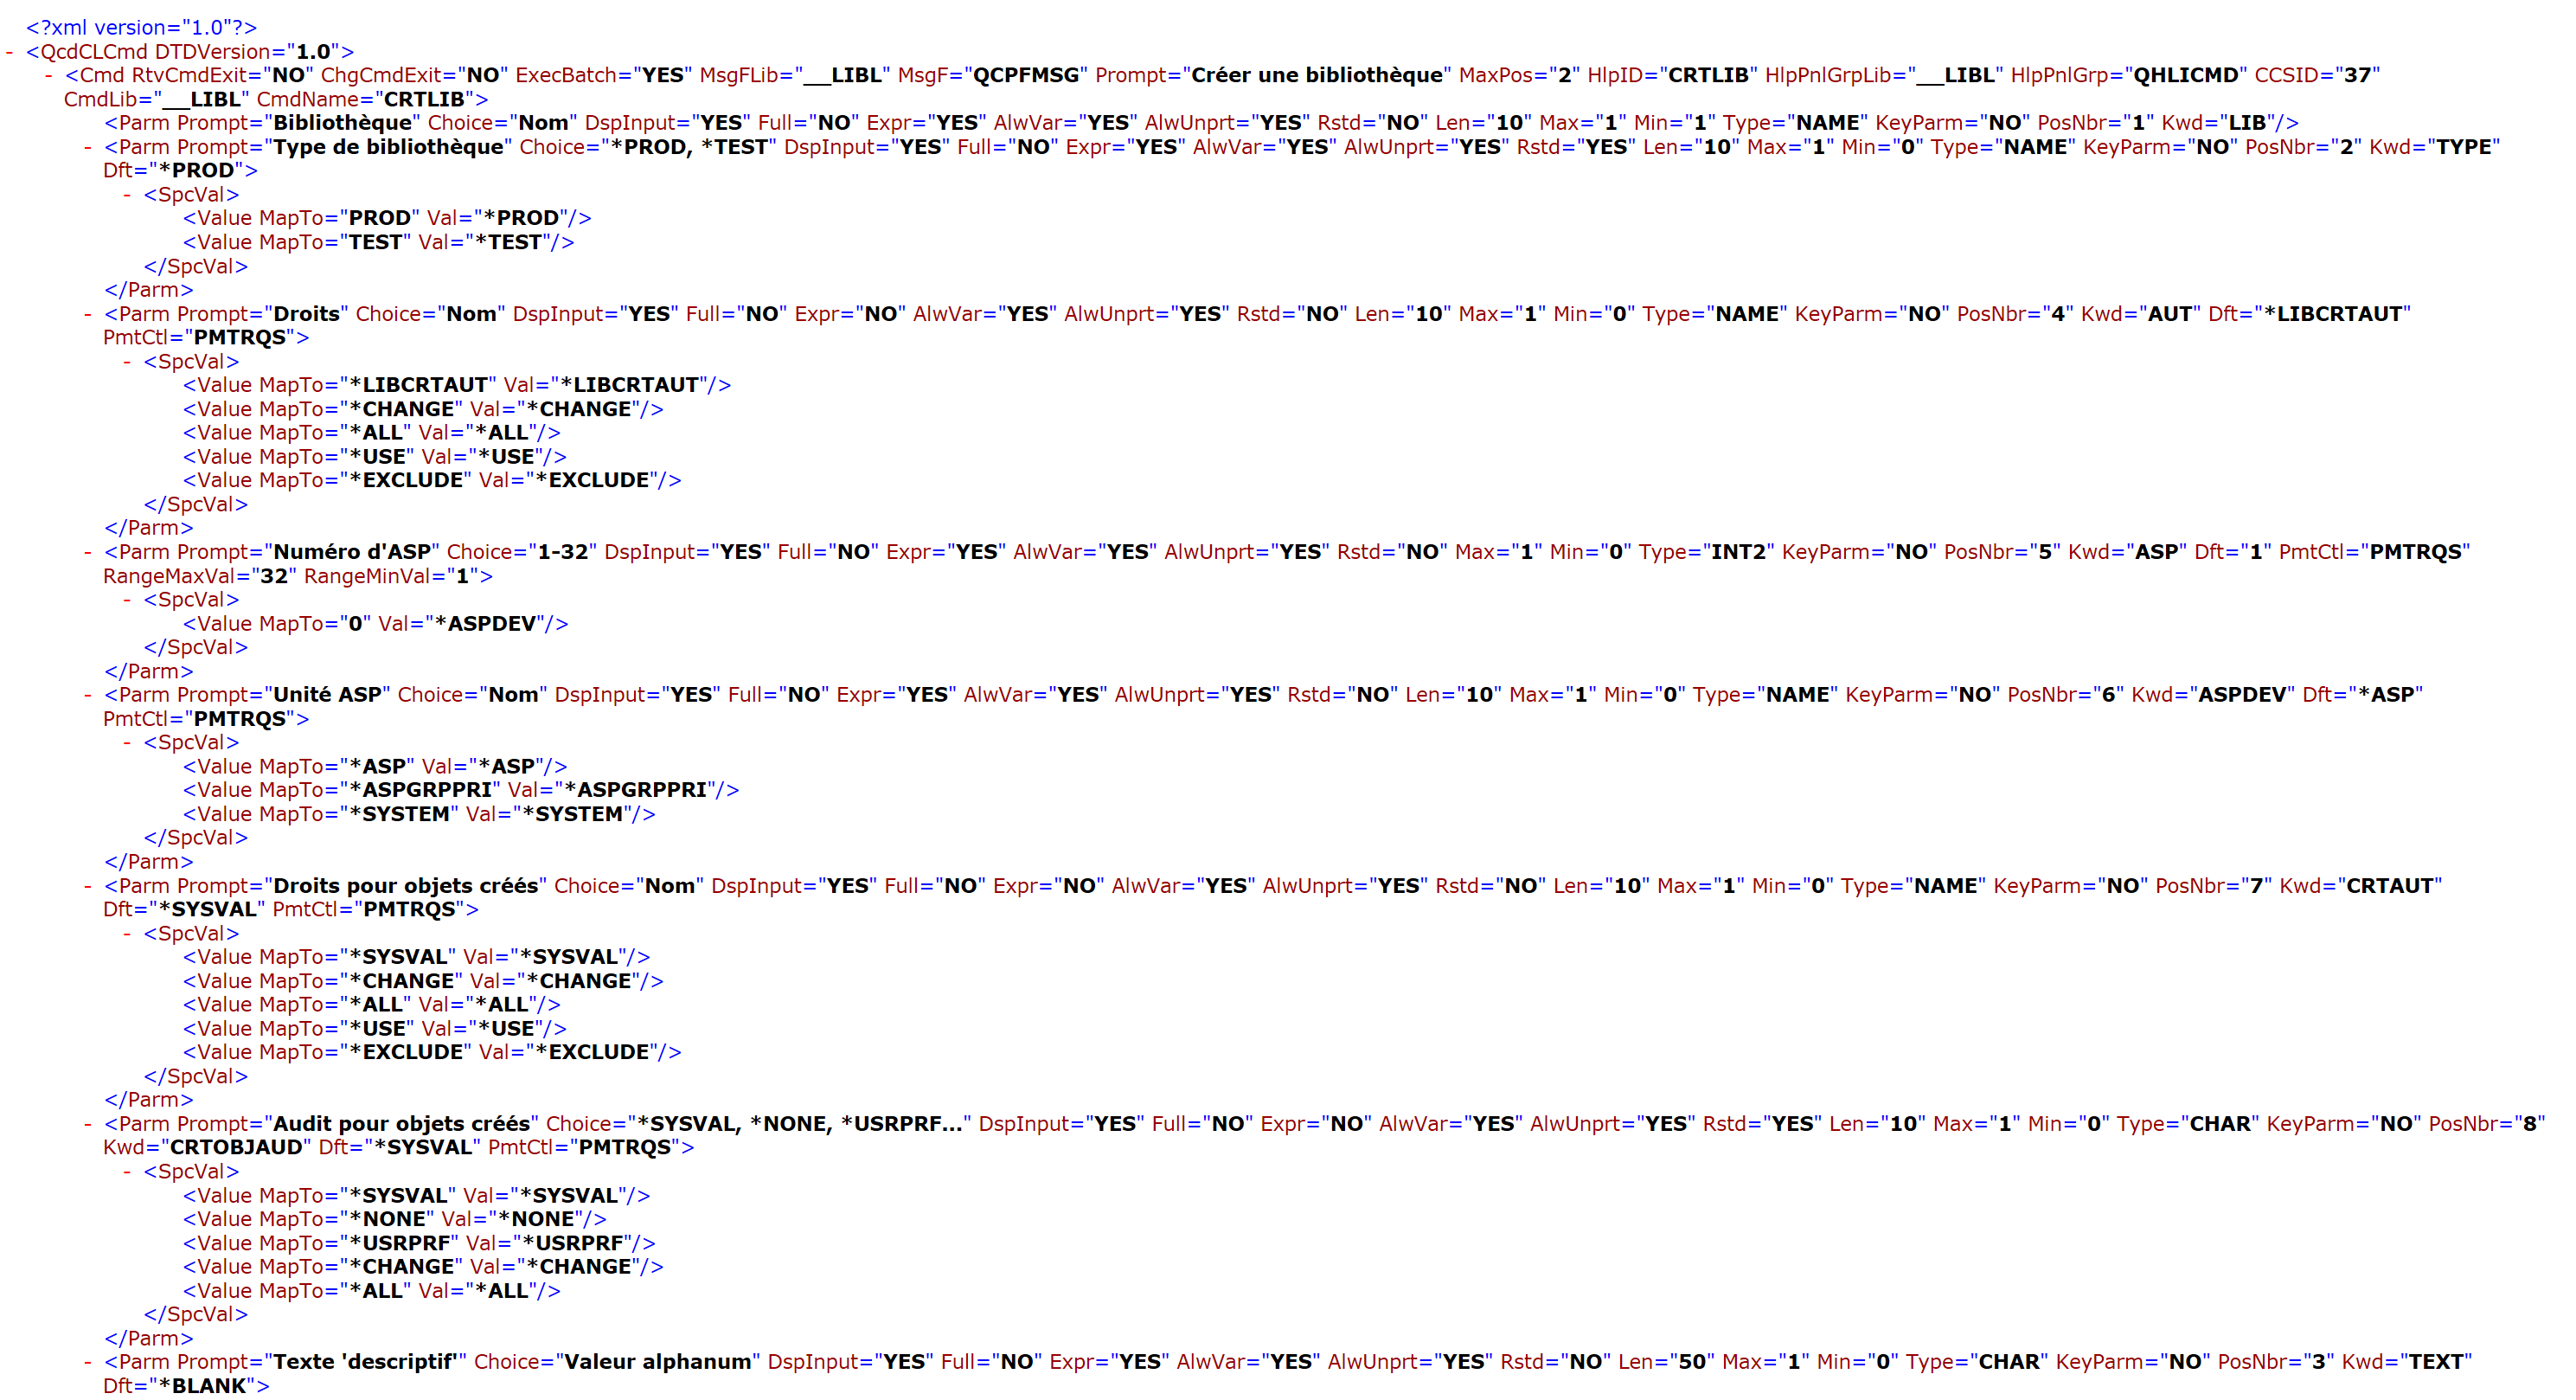
- Retrieval of the command's XML stream (CDML)
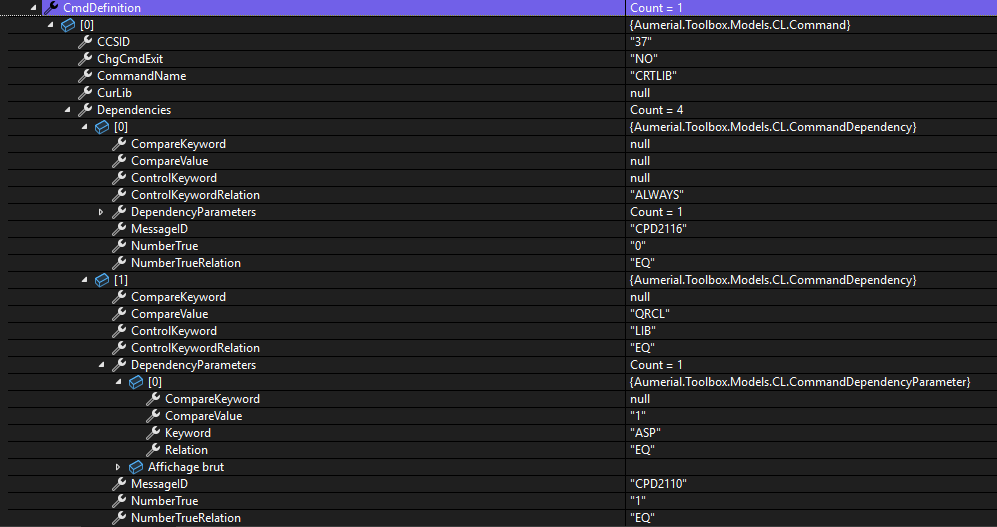
- Deserialization of that stream into a strongly typed C# object, ready to use in .NET applications.
Depending on the use case, two approaches are available:
- Retrieve the raw XML directly with
RetrieveCommandDefinitionXml()for custom processing, such as via external APIs or analysis tools.
- Use the structured C# object returned by
RetrieveCommandDefinition()to automatically and dynamically generate modern user interfaces, as illustrated in this tutorial with Blazor.
From a single instruction:
CommandDefinition commandDef = conn.RetrieveCommandDefinition("CRTLIB", "QSYS", false);A complete, immediately usable description is returned, including:
- The full list of parameters (mandatory and optional)
- Their exact types (text, numeric, qualified, list, and so on)
- Default, special and single values
- All conditional dependencies (Control Prompt) between parameters
- Detailed sub-elements of each complex parameter
This ability to dynamically generate the structure of CL commands opens the door to new use cases: creating interactive forms with automatic pre-filling, advanced parameter validation automation, and automatic generation of ready-to-use CL commands.
💡The code presented in this article is provided for illustrative purposes only. It does not represent a definitive or optimized solution for all use cases. It simply demonstrates what can be achieved with NTi Toolbox methods and Blazor.
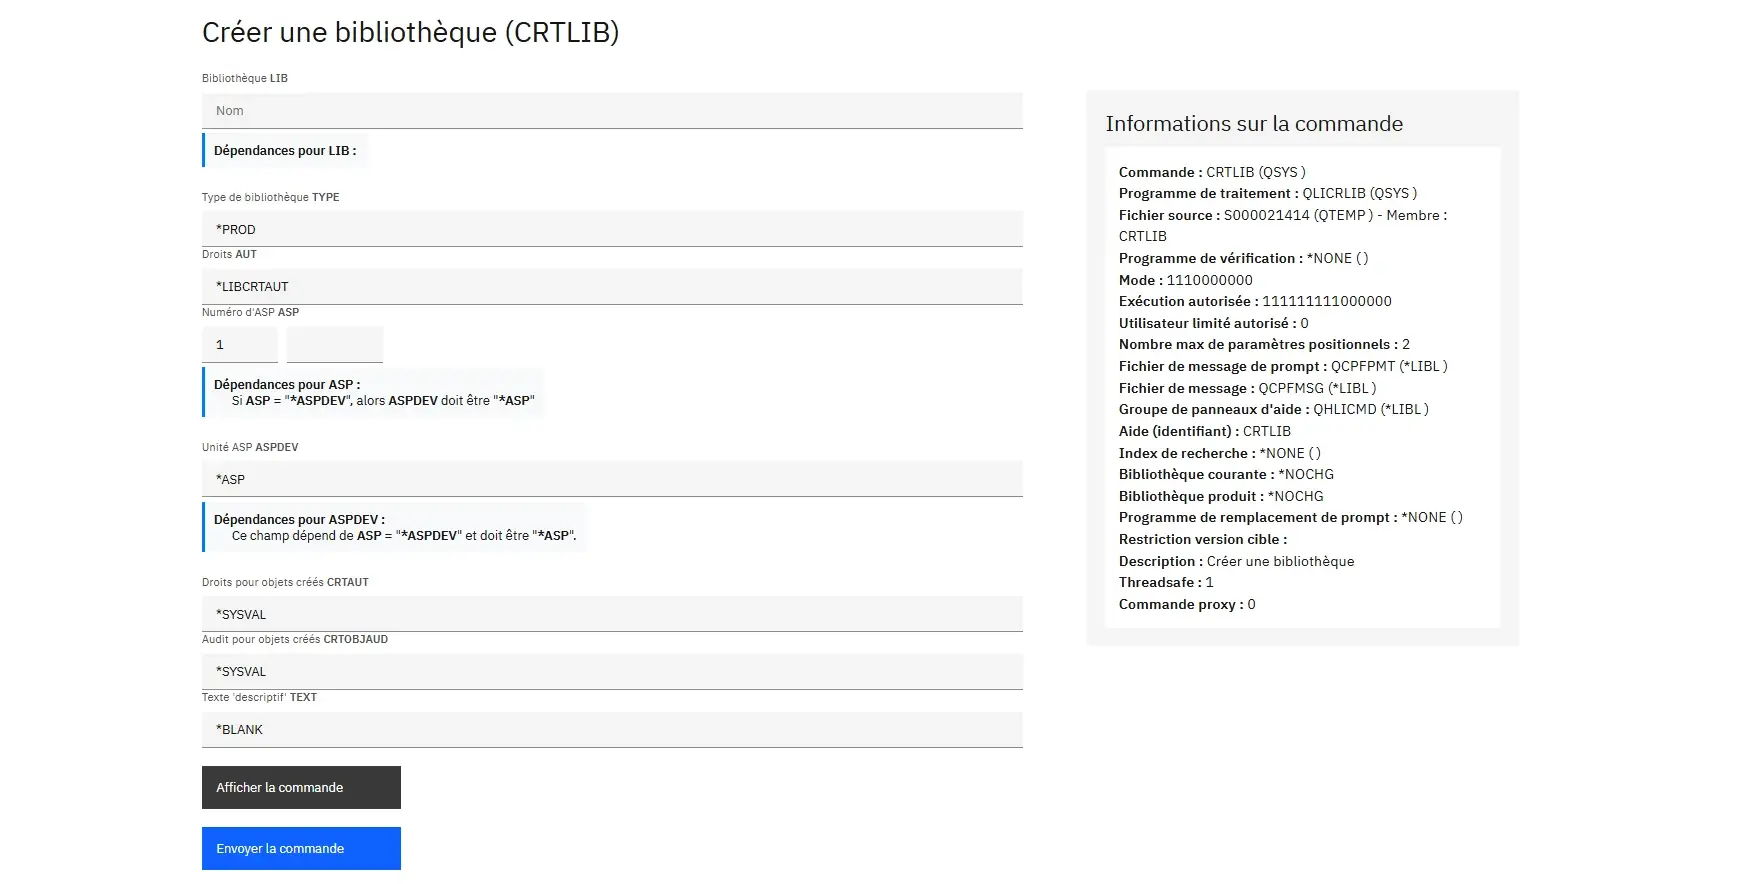
The scenario: build a dynamic interface for any CL command
To illustrate these possibilities in a concrete way, this tutorial uses a Blazor Web App (.NET 8) with NTi Data Provider and the Toolbox extension. The goal is to build a dynamic, generic interface that allows:
- Loading the detailed structure of any CL command (standard or custom)
- Automatically generating the appropriate input fields (text, dropdown, checkboxes, and so on)
- Dynamically building the complete, ready-to-use CL syntax
- Executing the validated command directly on IBM i
All presented in a modern interface using IBM's Carbon design system.
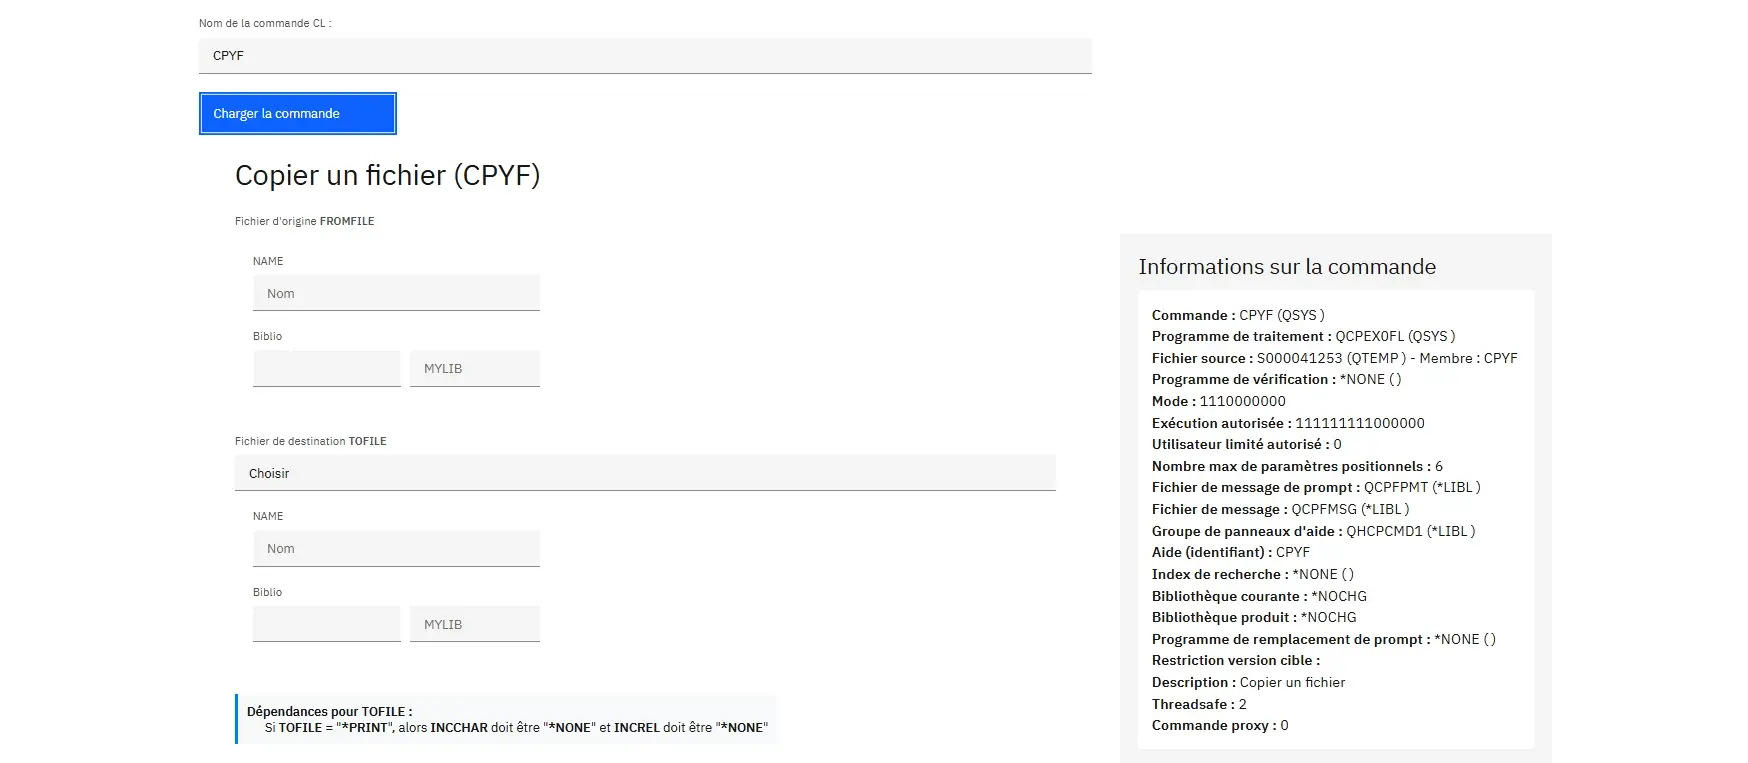
Step 1 - Dynamically load the structure of a command
The first step is to dynamically load the complete structure of a CL command entered by the user. This structure is then used to automatically generate the form input fields.
Prerequisites:
- Install the
Aumerial.Data.NtiNuGet package - Install the
Aumerial.ToolboxNuGet package - Instantiate an
NTiConnectionpointing to IBM i
As soon as the user enters a command name (for example CRTLIB), the Blazor application queries the IBM i API via NTi and retrieves all the information needed to dynamically build the form.
Internal data structure declarations
In the Blazor component code, several variables manage the form state and store entered values:
// Main object holding the complete command definition
private CommandDefinition? Command;

// The currently selected command
private Command? SelectedCommand;

// Storage for simple values associated with each keyword (Kwd)
private Dictionary<string, string> CommandValues = new();

// Handling of qualified parameters (e.g. File(NAME/LIB))
private Dictionary<string, Dictionary<string, string>> QualifierValues = new();

// Allows entering a custom value (override)
private Dictionary<string, Dictionary<string, string>> QualifierCustom = new();

// Handling of sub-elements for complex ELEM type parameters
private Dictionary<string, Dictionary<string, string>> ElementValues = new();

// Handling of multiple selections via checkboxes
private Dictionary<string, Dictionary<string, bool>> CheckedValues = new();
These dictionaries independently manage each type of data associated with the different parameters.
Dynamic data retrieval and initialization
When a user enters a command and confirms, the RetrieveCommandDefinition() method is called:
try
{
    // Call RetrieveCommandDefinition() from NTiConnection via Toolbox
    Command = await Task.Run(() => DBService.Conn.RetrieveCommandDefinition(CommandName.ToUpper(), "QSYS", true));
    // Check that a valid command was returned
    if (Command != null && Command.CmdDefinition.Any())
    {
        // Select the first returned command
        SelectedCommand = Command.CmdDefinition.FirstOrDefault();
        if (SelectedCommand != null)
        {
            / Reset dictionaries before use
            CommandValues.Clear();
            QualifierValues.Clear();
            QualifierCustom.Clear();
            CheckedValues.Clear();
            ElementValues.Clear();
            // Iterate through parameters for individual initialization
            foreach (var param in SelectedCommand.Parameters)
            {
                // Store the default value, or empty string if not defined
                CommandValues[param.Kwd] = param.Dft ?? string.Empty;
                // Initialize checkboxes for multi-select parameters
                if (param.SpecialValues.Any() && int.TryParse(param.Max, out int max) && max > 1)
                {
                    CheckedValues[param.Kwd] = new Dictionary();
                    foreach (var spcVal in param.SpecialValues.SelectMany(s => s.SpecialValues))
                    {
                        CheckedValues[param.Kwd][spcVal.Value] = false;  // aucune sélection cochée par défaut
                    }
                }
                // Initialize qualified parameters (QUAL type, e.g. FILE(NAME/LIB))
                QualifierValues[param.Kwd] = new Dictionary();
                QualifierCustom[param.Kwd] = new Dictionary();

                int qualIndex = 0;
                foreach (var qual in param.Qualifiers)
                {
                    var key = !string.IsNullOrEmpty(qual.Prompt) ? qual.Prompt : $"{qual.Type}_{qualIndex++}";

                    // For QUAL type parameters, initialize values to empty by default
                    QualifierValues[param.Kwd][key] = param.Type == "QUAL" ? "" : (qual.Dft ?? "");
                    QualifierCustom[param.Kwd][key] = ""; // toujours vide initialement pour une éventuelle saisie utilisateur
                }

                // Initialize sub-elements for complex parameters (ELEM type)
                ElementValues[param.Kwd] = new Dictionary();
                foreach (var elem in param.Elements)
                {
                    ElementValues[param.Kwd][elem.Prompt] = elem.Dft ?? string.Empty;
                }
            }
        }
    }
}
catch (Exception ex)
{
    errorMessage = ex.Message;
}
Once the complete structure is retrieved, each parameter returned by the API is iterated to determine:
- The default values to display in simple fields
- Multiple options (checkboxes) and their initial state (unchecked by default)
- Any qualified values (name/library) to present
- Sub-elements of complex parameters to display separately
This approach ensures that all necessary information is immediately available, structured and isolated in the dictionaries, to dynamically build an interface suited to any CL command regardless of its complexity.
👉 For more details on the returned structure, see the RetrieveCommandDefinition method documentation.
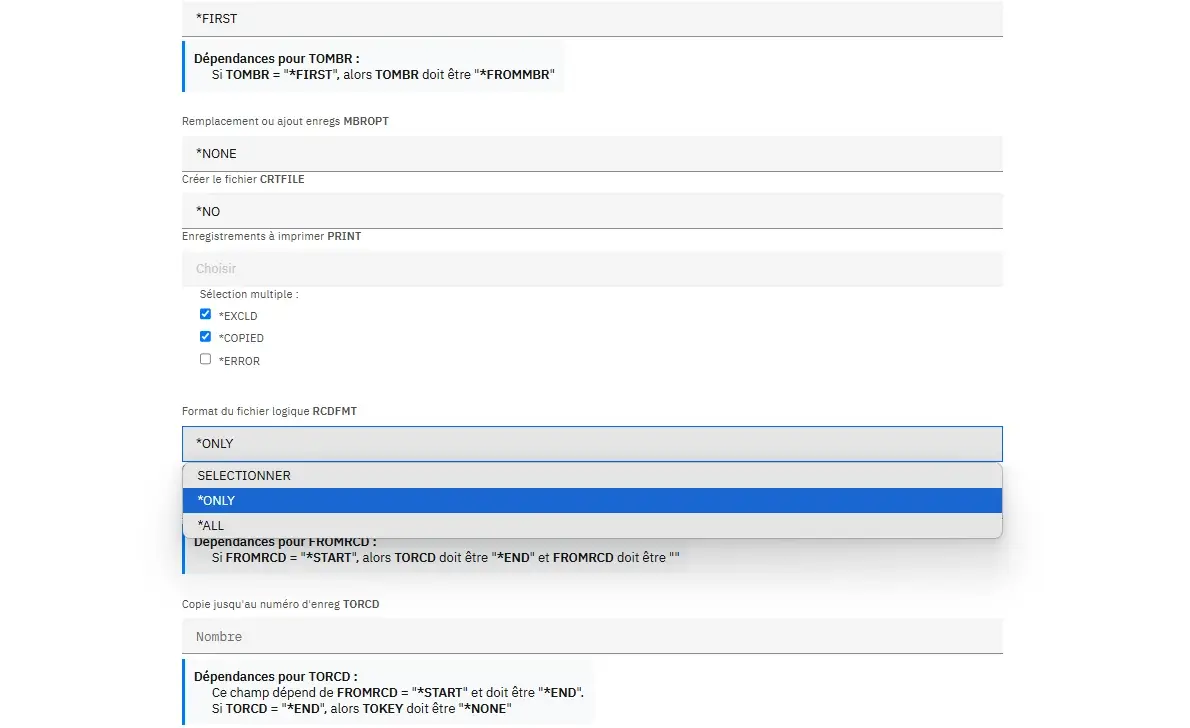
Step 2 - Dynamically generate input fields
Once the CL command structure is loaded and the state dictionaries are initialized, input fields suited to each parameter can be dynamically generated in the Blazor interface.
Each parameter from SelectedCommand.Parameters is iterated and conditional logic is applied to display the right component based on the type and constraints defined on the IBM i side: simple type, special values, qualified parameter, nested elements, multiple selection, and so on.
Metadata-driven logic
Each parameter is processed in a @foreach loop, and based on its properties (Type, SpecialValues, Elements, and so on), a specific rendering is generated:
@foreach (var param in SelectedCommand.Parameters)
{
    if (param.Type == "QUAL")
    {
        foreach (var key in QualifierValues[param.Kwd].Keys)
        {
            <input class="bx--text-input" @bind="QualifierValues[param.Kwd][key]" placeholder="@key" />
        }
    }
    else if (param.SpecialValues.Any())
    {
        <select class="bx--select-input" @bind="CommandValues[param.Kwd]">
            <option value="">Choisir</option>
            @foreach (var val in param.SpecialValues.SelectMany(s => s.SpecialValues))
            {
                <option value="@val.Value">@val.Value</option>
            }
        </select>
    }
    else if (param.Elements.Any())
    {
        <fieldset>
            @foreach (var elem in param.Elements)
            {
                <input class="bx--text-input" @bind="ElementValues[param.Kwd][elem.Prompt]" placeholder="@elem.Prompt" />
            }
        </fieldset>
    }
    else if (param.Type == "CHAR")
    {
        <input class="bx--text-input" @bind="CommandValues[param.Kwd]" placeholder="@param.Prompt" maxlength="@param.Len" />
    }
}
The rendering adapts to the expected IBM i behavior using the metadata returned by the API via NTi:
- Maximum allowed length -
param.Len - Hint text -
param.Prompt - Default values -
param.Dft - Allowed values -
SpecialValues - Input groups (qualified, nested elements)
Each field is directly bound to the initialized state dictionaries (CommandValues, QualifierValues, ElementValues, and so on), allowing entered or selected values to be captured immediately.
Handling dependencies
Some commands include conditional dependencies between parameters, known as Control Prompt and exposed via SelectedCommand.Dependencies.
These rules can be used to disable, pre-fill or make certain fields mandatory based on values entered in other fields. For example: if the TYPE parameter is set to *USR, then OWNER becomes required.
💡This tutorial does not cover their handling in the interface in detail, but all the necessary elements are accessible via
RetrieveCommandDefinition()to integrate them easily into the Blazor component.
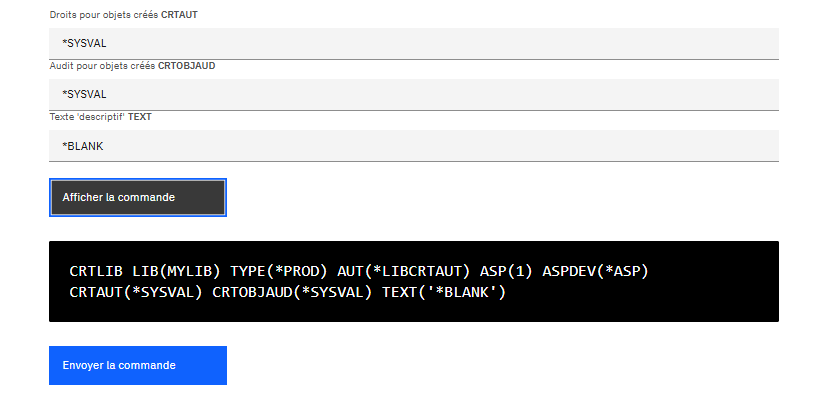
Step 3 - Dynamically build the CL command
At this point, all fields have been filled in and their values are stored in the internal dictionaries. The goal is to dynamically reconstruct the complete CL command syntax as a string ready to be executed on IBM i.
This logic is centralized in the BuildCommandCL() method:
string BuildCommandCL()
{
    var commandCl = SelectedCommand.CommandName.ToUpperInvariant().Trim() + " ";
    foreach (var param in SelectedCommand.Parameters)
    {
        if (!string.IsNullOrWhiteSpace(CommandValues[param.Kwd]))
        {
            string value = CommandValues[param.Kwd].ToUpperInvariant().Trim();
            if (param.Kwd.Equals("TEXT", StringComparison.OrdinalIgnoreCase))
            {
                value = $"'{value}'"; // Le champ TEXT est entre quotes
            }
            commandCl += $"{param.Kwd.ToUpperInvariant()}({value}) ";
        }
        else
        {
            var segment = new List();

            // Éléments imbriqués (ELEM)
            if (ElementValues.TryGetValue(param.Kwd, out var elements))
            {
                var values = elements.Values.Where(v => !string.IsNullOrWhiteSpace(v))
                                            .Select(v => v.ToUpperInvariant().Trim()).ToList();
                if (values.Any())
                {
                    segment.Add($"{param.Kwd.ToUpperInvariant()}({string.Join(" ", values)})");
                }
            }

            // Paramètres qualifiés (QUAL)
            if (QualifierValues.TryGetValue(param.Kwd, out var qualifiers) &&
                QualifierCustom.TryGetValue(param.Kwd, out var customQualifiers))
            {
                var values = qualifiers.Keys.Select(key => !string.IsNullOrWhiteSpace(customQualifiers[key])
                                                           ? customQualifiers[key]
                                                           : qualifiers[key])
                                             .Where(v => !string.IsNullOrWhiteSpace(v)).ToList();

                if ((param.Kwd == "FILE" || param.Kwd == "SRCFILE") && values.Count < 2)
                {
                    // Ne rien générer si l’un des éléments est manquant
                }
                else if (values.Any())
                {
                    var combined = string.Join("/", values.AsEnumerable().Reverse());
                    segment.Add($"{param.Kwd.ToUpperInvariant()}({combined.ToUpperInvariant().Trim()})");
                }
            }

            // Sélections multiples (checkbox)
            if (CheckedValues.TryGetValue(param.Kwd, out var checkDict))
            {
                var checkedValues = checkDict.Where(x => x.Value).Select(x => x.Key.ToUpperInvariant().Trim());
                if (checkedValues.Any())
                {
                    segment.Add($"{param.Kwd.ToUpperInvariant()}({string.Join(",", checkedValues)})");
                }
            }

            if (segment.Any())
            {
                commandCl += string.Join(" ", segment) + " ";
            }
        }
    }
    return commandCl.Trim();
}
The final command is built from the main name (DLTLIB, CRTLIB, and so on), followed by parameters dynamically formatted according to their type:
- If a simple value is entered via
CommandValues, it is added directly, with special handling for theTEXTparameter (wrapped in single quotes) - For nested
ELEMtype parameters, sub-values are assembled separated by a space - For qualified
QUALparameters, sub-values are combined (e.g. file/library), taking into account any manual input - For multiple values (checkboxes), all selected options are concatenated with a comma, as in
OPTION(*SRC,*MBR)
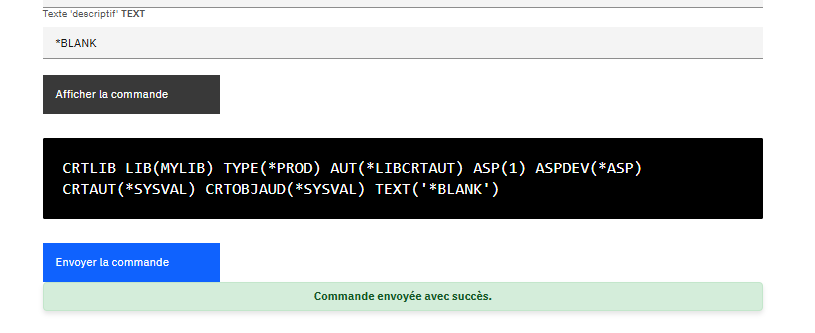
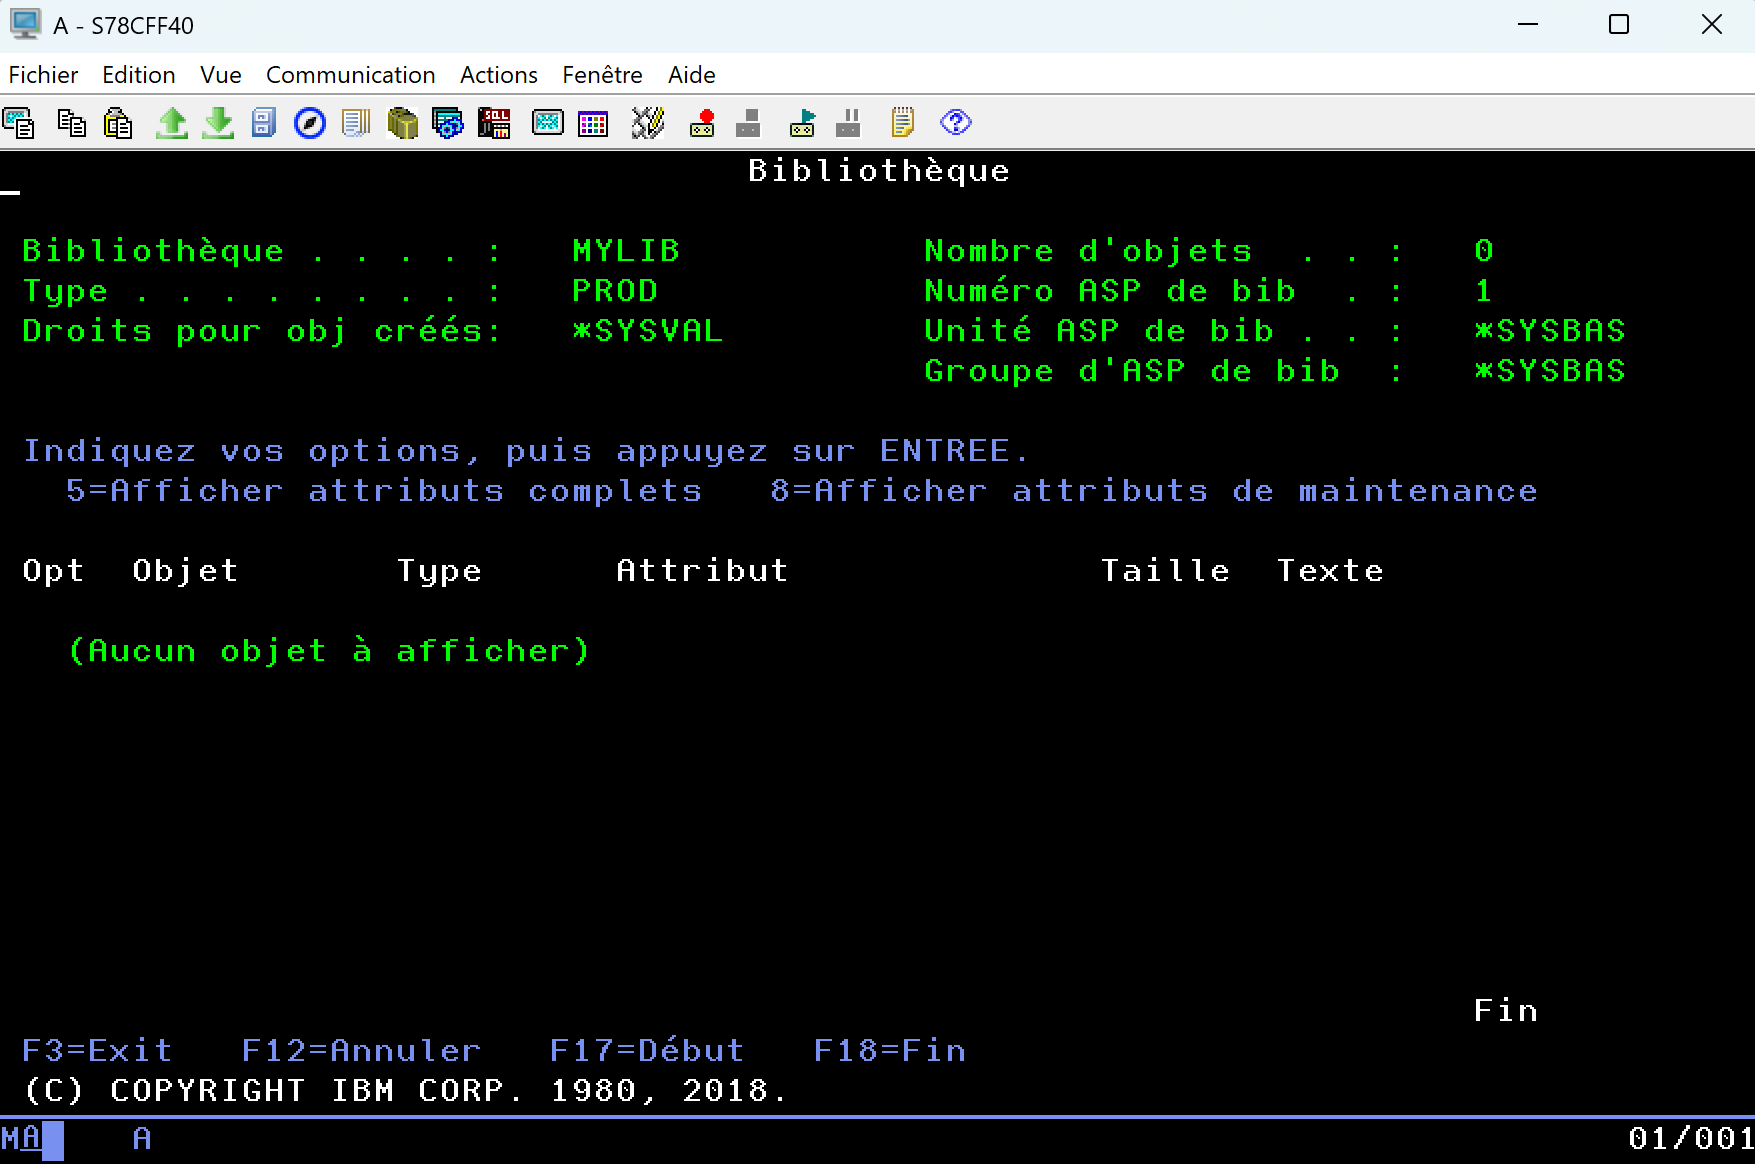
The result is a complete, clean CL command ready to execute on IBM i, exactly as if it had been entered in a 5250 terminal, but dynamically generated from a modern interface.
Step 4 - Execute the command on IBM i
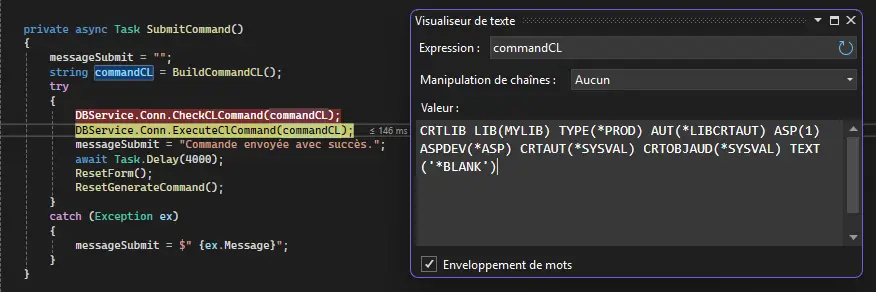
Once the command is built, it is validated then executed in two steps inside the SubmitCommand() method:
private async Task SubmitCommand()
{
    messageSubmit = "";
    string commandCL = BuildCommandCL();
    try
    {
        DBService.Conn.CheckCLCommand(commandCL);
        DBService.Conn.ExecuteClCommand(commandCL);
        messageSubmit = "Commande envoyée avec succès.";

        await Task.Delay(4000);
        ResetForm();
        ResetGenerateCommand();
    }
    catch (Exception ex)
    {
        messageSubmit = $"{ex.Message}";
    }
}
Prior validation with CheckCLCommand()
Before any submission, the command is validated via CheckCLCommand(), available through the NTi Toolbox extension. It queries IBM i to fully analyze the syntactic validity of the command without executing it: unknown keywords, malformed values, missing mandatory parameters. This upfront check reproduces exactly the behavior of the system in a 5250 environment.
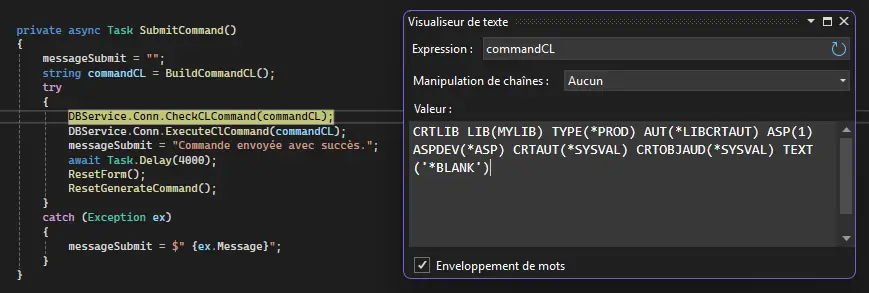
Execution with ExecuteClCommand()
Once validated, the command is sent via ExecuteClCommand(), a method exposed by the NTiConnection class. It runs within the already open session, with its full environment: user, active job, current library, permissions. All return messages or system errors are surfaced exactly as if the command had been run directly from an IBM i terminal.
What is controlled on the Blazor/.NET side
The entire process is handled within the .NET application, which orchestrates command generation, syntax validation, execution and error handling through a try/catch block.
Conclusion
With RetrieveCommandDefinition() and RetrieveCommandDefinitionXml(), provided by NTi Toolbox, it is possible to dynamically generate input interfaces for any CL command, relying solely on the metadata returned by the QCDRCMDD API.
RetrieveCommandDefinition() fully encapsulates this process on the .NET side: it queries the IBM i API, retrieves the XML stream in CDML format, decodes it and deserializes it into a strongly typed C# object. No manual parsing or XML manipulation is required. The entire command structure (parameters, types, values, dependencies) is immediately available and ready to use in code.
This abstraction significantly reduces development overhead, allowing full focus on UX and business logic, without ever manually coding the structure of each command.
But above all, it breaks free from the constraints of a 5250 terminal. The interface becomes portable, accessible from a browser, a business application, a client workstation or a containerized platform. In other words, this shift in approach opens the door to genuinely new use cases:
- Simplified forms for teams with no IBM i expertise
- Centralized commands in an administration portal
- Integration into DevOps workflows or support tools
- Automation of system or technical tasks, without a green screen session
You don't leave IBM i, you extend it. To the web, to .NET, to tomorrow.
Toolbox methods are not meant to replace IBM i skills, they remove technical complexity and carry them forward into a new ecosystem, more agile and accessible.
Quentin Destrade