Introduction
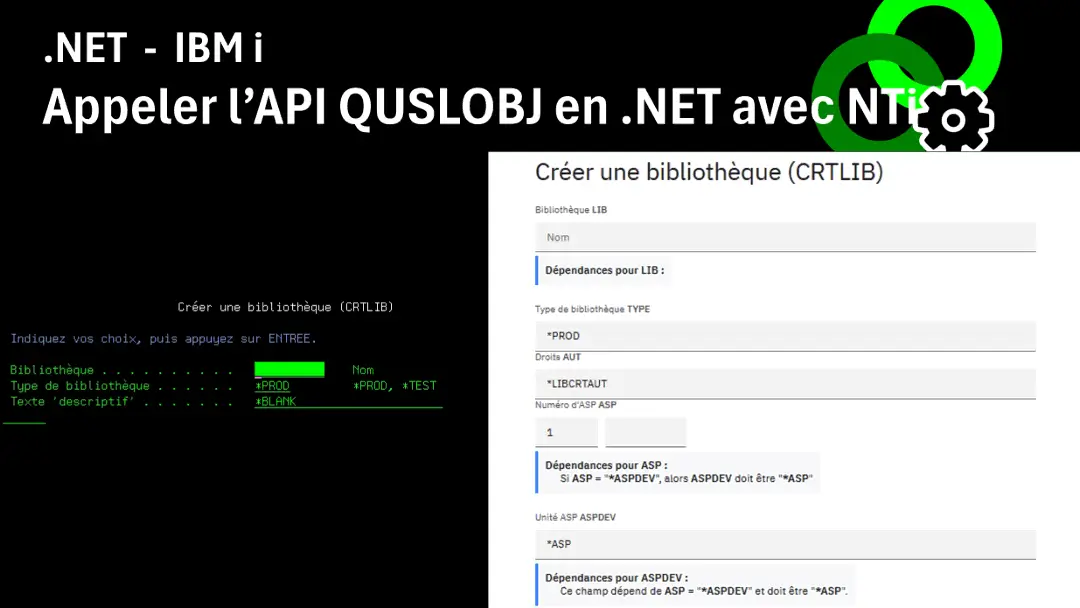
Lorsqu'il s'agit de lancer des commandes CL(CMD) sur IBM i, la plupart des utilisateurs passent encore par les écrans verts traditionnels (5250). Ces interfaces, bien qu’efficaces pour des initiés, sont souvent complexes et peu intuitives pour des utilisateurs ayant peu ou pas de compétence IBM i. Des solutions existent aujourd’hui pour moderniser, simplifier et enrichir l'expérience utilisateur.
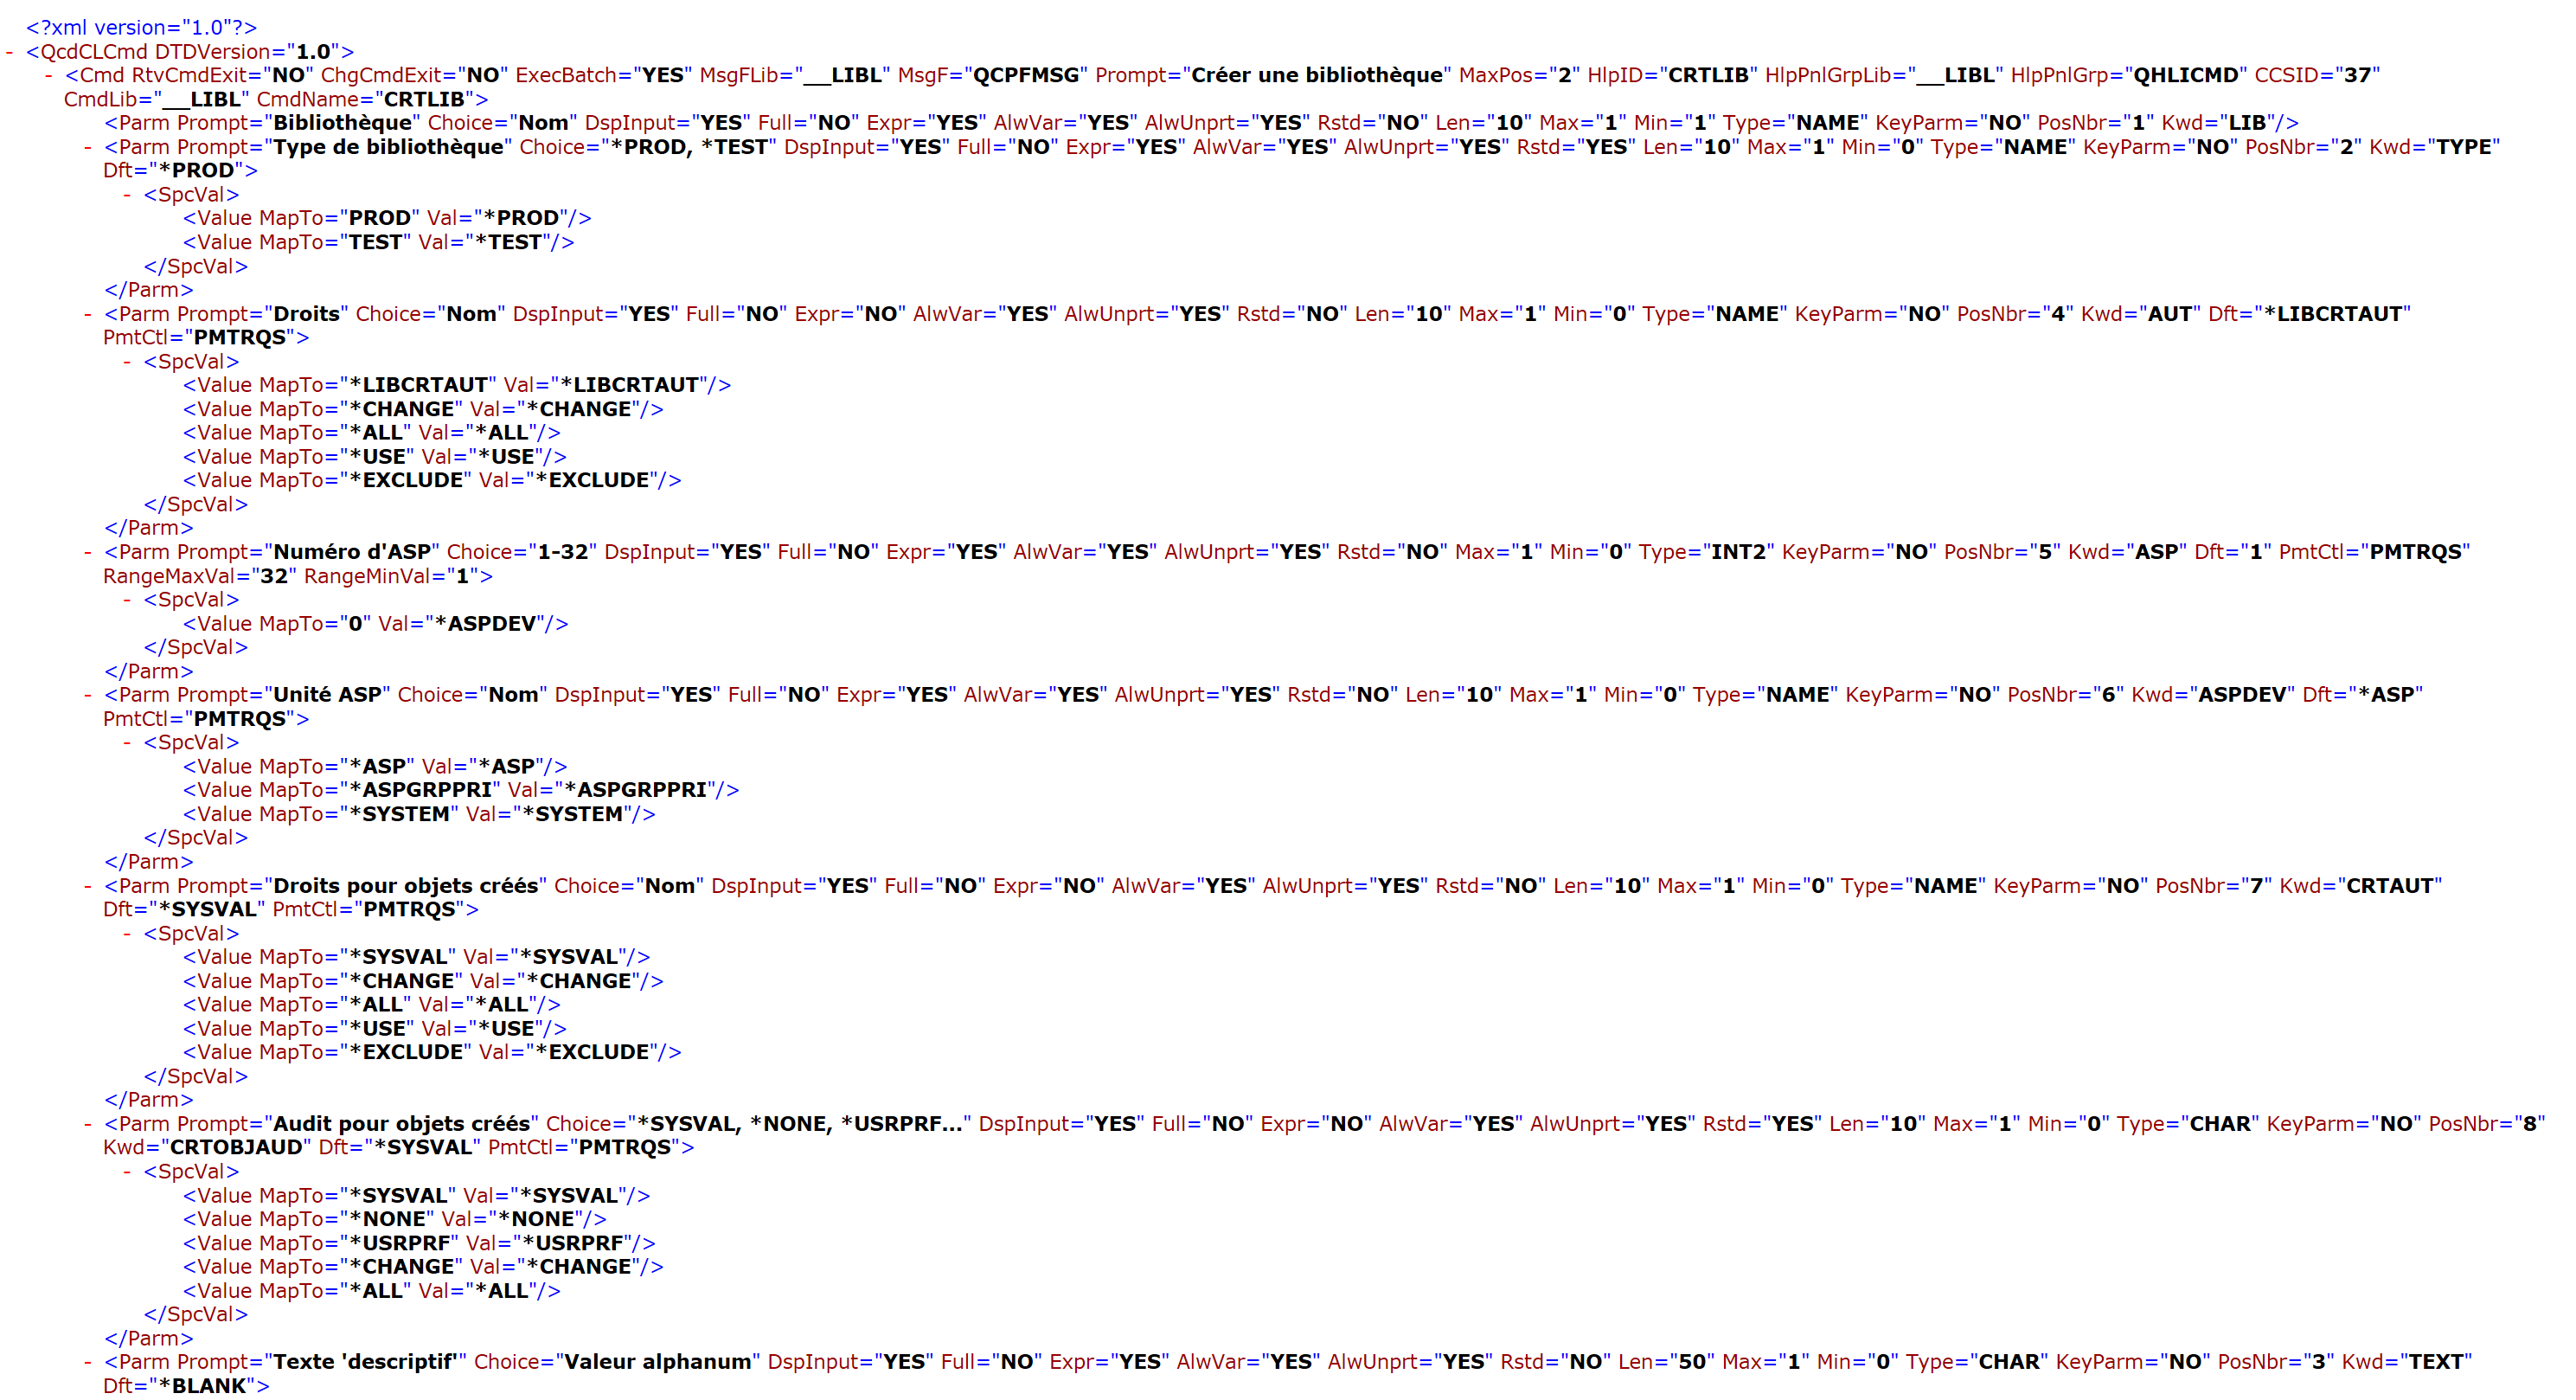
Avec NTi et son extension Toolbox, disponible sous forme de package NuGet, vous pouvez interroger directement l'API système QCDRCMDD, fournie par IBM, pour récupérer automatiquement la description complète d'une commande CL.
La méthode RetrieveCommandDefinition() encapsule complètement cette opération, en effectuant automatiquement:
- 1️⃣ L'appel de l'API.
- 2️⃣ La récupération du flux XML (CDML) de la commande.
- 3️⃣ La désérialisation de ce flux en un objet C# fortement typé, directement utilisable dans vos applications .NET.
Selon vos besoins, vous pouvez :
- Récupérer directement le XML brut avec la méthode
RetrieveCommandDefinitionXml()pour une exploitation personnalisée, notamment via des API ou des outils d’analyse externes.
- Utiliser l'objet C# structuré renvoyé par
RetrieveCommandDefinition(), pour générer automatiquement et dynamiquement des interfaces utilisateur modernes, notamment avec Blazor comme illustré dans ce tutoriel.
Ainsi, à partir d'une seule instruction
CommandDefinition commandDef = Conn.RetrieveCommandDefinition("CRTLIB", "QSYS", false);Vous obtenez une description complète et exploitable immédiatement dans votre code, comprenant notamment:
- La liste exhaustive des paramètres (obligatoires et optionnels)
- Leurs types précis (texte, numérique, qualifié, liste, etc.)
- Les valeurs par défaut, spéciales et uniques
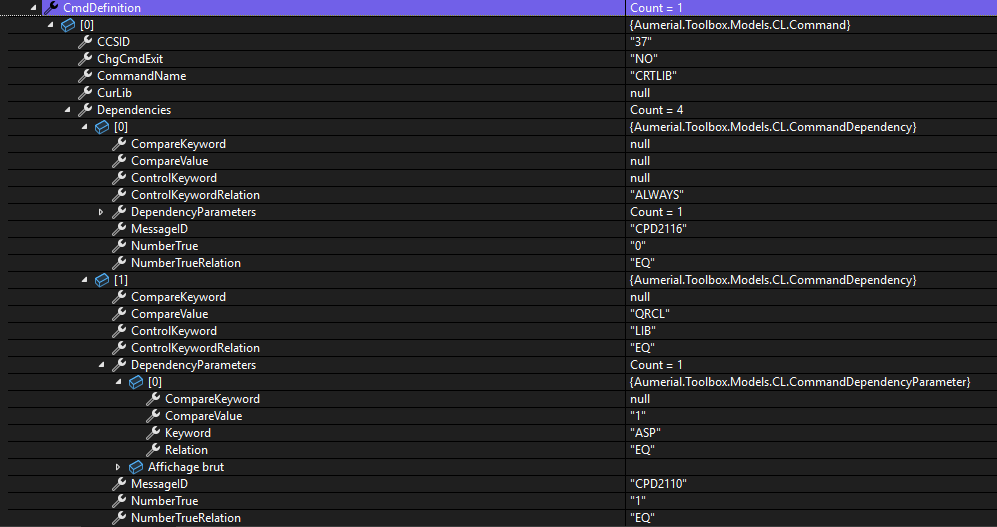
- Toutes les dépendances conditionnelles (Control Prompt) entre les paramètres
- Les sous-éléments détaillés de chaque paramètre complexe
Cette capacité à générer dynamiquement la structure des commandes CL ouvre la voie à de nouveaux usages tels que la création de formulaires interactifs avec pré-remplissage automatique, l’automatisation avancée des validations de paramètres, et la génération automatique de commandes CL prêtes à l’emploi pour simplifier leur exécution et leur réutilisation.
💡 Le code présenté dans cet article est fourni à titre indicatif uniquement. Il ne constitue pas une solution définitive ni optimisée pour tous les contextes d’utilisation. Il illustre simplement ce qu’il est possible de réaliser avec les méthodes de Toolbox Extensions NTi et Blazor.
Le scénario : créer une interface dynamique pour n’importe quelle commande CL
Pour illustrer concrètement ces possibilités, nous allons réaliser dans ce tutoriel une application Blazor Web App (.NET 8) s'appuyant sur NTi et l'extension Toolbox. L'objectif sera de construire une interface dynamique, générique, permettant:
- De charger la structure détaillée de n'importe quelle commande CL (standard ou personnalisée).
- De générer automatiquement les champs de saisie adaptées (texte, liste déroulante, cases à cocher, etc.).
- De construire dynamiquement la syntaxe CL complète prête à l'emploi.
- D'exécuter cette commande validée directement coté IBM i.
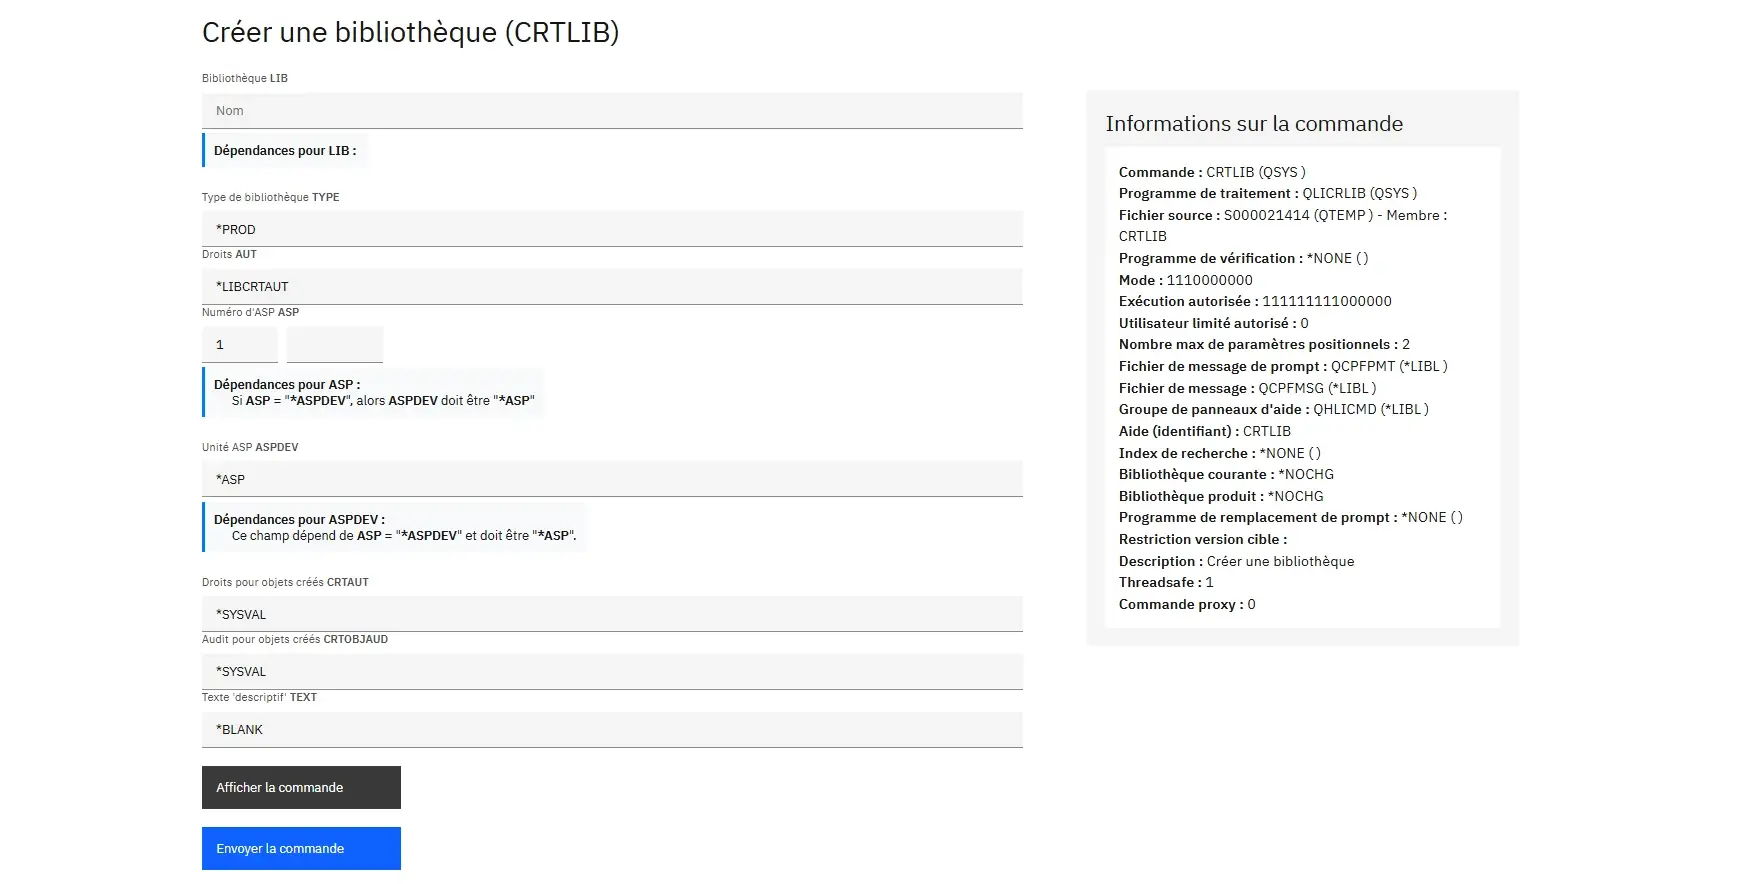
Le tout présenté dans une interface moderne, avec le design Carbon d’IBM, radicalement différente de l'approche traditionnelle IBM i.
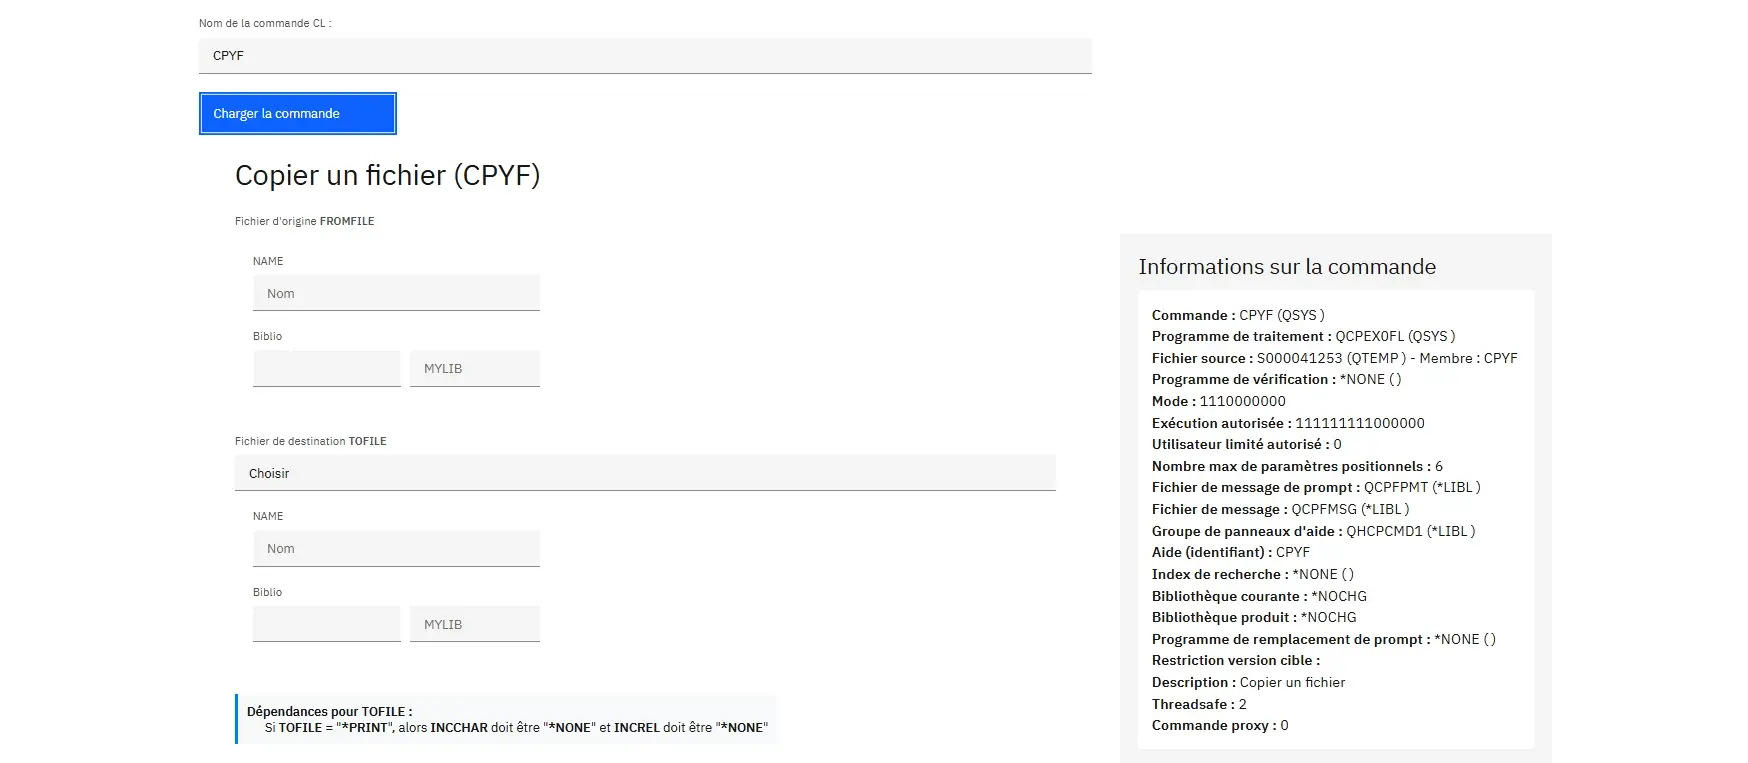
Étape 1 : Charger dynamiquement la structure d’une commande
La première étape consiste à charger dynamiquement la structure complète d'une commande CL saisie par l'utilisateur. Cette structure sera ensuite exploitée pour générer automatiquement les champs du formulaire de saisie.
Avant toute chose, il est nécessaire d'établir une connexion classique à l'IBM i via NTi:
- Installer le package NuGet
Aumerial.Data.Nti(NTi Data Provider). - Ajouter ensuite le package NuGet
Aumerial.Toolboxpour accéder aux méthodes CL. - Instancier une connexion
NTiConnectionpointant vers votre IBM i, et référencer les 2 packages dans votre projet.
Une fois cette configuration faite, l’application peut interroger le système pour récupérer la description complète d'une commande.
Concrètement, dès que l'utilisateur saisit le nom d'une commande (par exemple CRTLIB), l'application Blazor interroge l'API IBM i via NTi et récupère toutes les informations nécessaires à la construction dynamique du formulaire.
1️⃣ Déclaration des structures de données internes
Dans le code du composant Blazor, on déclare plusieurs variables qui vont permettre de gérer l'état du formulaire et de stocker les valeurs saisies par l'utilisateur:
// Objet principal contenant la définition complète de la commande
private CommandDefinition? Command;
// La commande actuellement sélectionnée
private Command? SelectedCommand;
// Stockage des valeurs simples associées à chaque mot-clé (Kwd) des paramètres de la commande
private Dictionary CommandValues = new();
// Gestion des paramètres qualifiés (ex : Fichier(NOM/LIB))
private Dictionary> QualifierValues = new();
// Permet à l'utilisateur de saisir une valeur personnalisée (override)
private Dictionary> QualifierCustom = new();
// Gestion des sous-éléments d’un paramètre complexe de type ELEM
private Dictionary> ElementValues = new();
// Gestion des sélections multiples via des cases à cocher
private Dictionary> CheckedValues = new();
Ces dictionnaires permettent de gérer de manière indépendante et isolée chaque type de donnée associée aux différents paramètres, assurant une gestion claire.
2️⃣ Récupération et initialisation dynamique des données
Lorsqu'un utilisateur saisit une commande et valide, on appelle la méthode RetrieveCommandDefinition():
try
{
    // Appel de la méthode RetrieveCommandDefinition() depuis NTiConnection via Toolbox
    Command = await Task.Run(() => DBService.Conn.RetrieveCommandDefinition(CommandName.ToUpper(), "QSYS", true));
    // Vérification qu'une commande valide a été retournée
    if (Command != null && Command.CmdDefinition.Any())
    {
        // Sélection de la première commande retournée
        SelectedCommand = Command.CmdDefinition.FirstOrDefault();
        if (SelectedCommand != null)
        {
            // Réinitialisation des dictionnaires avant utilisation
            CommandValues.Clear();
            QualifierValues.Clear();
            QualifierCustom.Clear();
            CheckedValues.Clear();
            ElementValues.Clear();
            // Parcours des paramètres pour initialisation individuelle
            foreach (var param in SelectedCommand.Parameters)
            {
                // Stockage de la valeur par défaut ou vide si non définie
                CommandValues[param.Kwd] = param.Dft ?? string.Empty;
                // Initialisation des checkboxes pour les paramètres à sélections multiples
                if (param.SpecialValues.Any() && int.TryParse(param.Max, out int max) && max > 1)
                {
                    CheckedValues[param.Kwd] = new Dictionary();
                    foreach (var spcVal in param.SpecialValues.SelectMany(s => s.SpecialValues))
                    {
                        CheckedValues[param.Kwd][spcVal.Value] = false;  // aucune sélection cochée par défaut
                    }
                }
                // Initialisation des paramètres qualifiés (type QUAL, ex: FILE(NOM/LIB))
                QualifierValues[param.Kwd] = new Dictionary();
                QualifierCustom[param.Kwd] = new Dictionary();

                int qualIndex = 0;
                foreach (var qual in param.Qualifiers)
                {
                    var key = !string.IsNullOrEmpty(qual.Prompt) ? qual.Prompt : $"{qual.Type}_{qualIndex++}";

                    // Si le paramètre est de type QUAL, initialiser les valeurs à vide par défaut
                    QualifierValues[param.Kwd][key] = param.Type == "QUAL" ? "" : (qual.Dft ?? "");
                    QualifierCustom[param.Kwd][key] = ""; // toujours vide initialement pour une éventuelle saisie utilisateur
                }

                // Initialisation des sous-éléments pour les paramètres complexes (type ELEM)
                ElementValues[param.Kwd] = new Dictionary();
                foreach (var elem in param.Elements)
                {
                    ElementValues[param.Kwd][elem.Prompt] = elem.Dft ?? string.Empty;
                }
            }
        }
    }
}
catch (Exception ex)
{
    errorMessage = ex.Message;
}
Une fois la structure complète de la commande récupérée, on valide qu'elle est correctement définie, et on initialise les dictionnaires internes pour stocker distinctement chaque valeur liée à cette commande. Concrètement, on parcours chaque paramètre retourné par l'API pour déterminer:
- Les valeurs par défaut à afficher dans les champs simples,
- Les options multiples (cases à cocher) et leur état initial (décochées par défaut),
- Les éventuelles valeurs qualifiées (nom/bibliothèque) à présenter à l’utilisateur,
- Les sous-éléments des paramètres complexes à afficher distinctement.
Cette démarche garantie d’avoir immédiatement à disposition toutes les informations nécessaires, structurées et isolées clairement dans nos dictionnaires, pour construire de manière dynamique une interface adaptée à chaque commande CL, quelles que soient sa complexité ou ses particularités, avec la certitude que tous les champs soient correctement préremplis, que les listes déroulantes, checkboxes et zones conditionnelles fonctionnent parfaitement, et que la commande sera reconstruite dynamiquement sans perte d’information.
👉 Pour plus de détails sur la structure retournée, vous pouvez consulter la documentation de la méthode RetrieveCommandDefinition
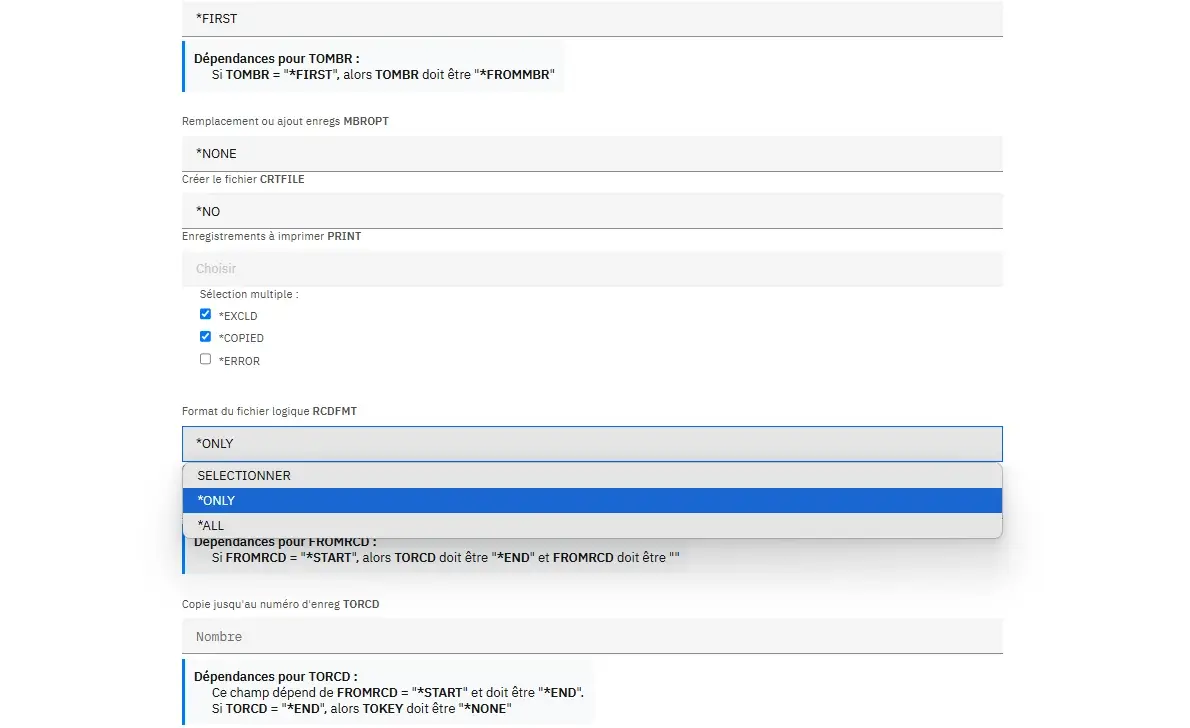
Étape 2 : Générer dynamiquement les champs de saisie
Une fois la structure complète de la commande CL chargée et nos dictionnaires d'état initialisés (voir étape 1), on peut générer dynamiquement les champs de saisie adaptés à chaque paramètre dans notre interface Blazor et qui reflète fidèlement les paramètres retournés par l'IBM i via NTi.
Concrètement, on parcours chaque paramètre issu de SelectedCommand.Parameters, et on applique une logique conditionnelle permettant d’afficher dynamiquement le bon composant en fonction du type et des contraintes définies côté IBM i : type simple, valeurs spéciales, paramètre qualifié, éléments imbriqués, sélection multiple, etc.
Une logique pilotée par les métadonnées
Chaque paramètre est traité dans une boucle @foreach, et selon ses propriétés (Type, SpecialValues, Elements, etc.), un rendu spécifique est généré. Cette logique repose sur des blocs if/else qui interprètent dynamiquement les métadonnées fournies par l'API pour chaque champ.
@foreach (var param in SelectedCommand.Parameters)
{
if (param.Type == "QUAL")
{
foreach (var key in QualifierValues[param.Kwd].Keys)
{
}
}
else if (param.SpecialValues.Any())
{
}
else if (param.Elements.Any())
{
}
else if (param.Type == "CHAR")
{
}
}
Le rendu n’est pas seulement dynamique dans sa structure, il s’adapte également au comportement attendu côté IBM i, grâce aux métadonnées renvoyées par l'API via NTi.
- La longueur maximale autorisée (
param.Len) - Le texte de suggestion (
param.Prompt) - Les valeurs par défaut (
param.Dft) - Les valeurs autorisées (
SpecialValues) - Les groupes de saisie (qualifiés, éléments imbriqués)
Si un paramètre de type CHAR a une longueur de 10 caractères avec une valeur par défaut, celle-ci sera automatiquement préremplie et la longueur limitée à 10 grâce à l'attribut maxlength. Si le paramètre attend une valeur qualifiée (ex : fichier + bibliothèque), plusieurs champs sont affichés et liés à leurs sous-parties.
Chaque champ est bindé directement aux dictionnaires d’état initialisés plus tôt (CommandValues, QualifierValues, ElementValues, etc.), ce qui permet de capturer immédiatement les valeurs saisies ou sélectionnées sans traitement supplémentaire.
Gestion des dépendances
Certaines commandes intègrent aussi des dépendances conditionnelles entre paramètres, connues sous le nom de Control Prompt et exposées via SelectedCommand.Dependencies. Ces règles peuvent être exploitées dans le composant pour désactiver, pré-remplir ou rendre obligatoires certains champs en fonction de valeurs saisies dans d'autres. Par exemple : si le paramètre TYPE vaut *USR, alors OWNER devient obligatoire.
Ce tutoriel n’aborde pas en détail leur gestion dans l’interface, mais tout les éléments nécessaires sont accessibles via la méthode
RetrieveCommandDefinition(), pour les intégrer facilement au sein du composant Bazor.
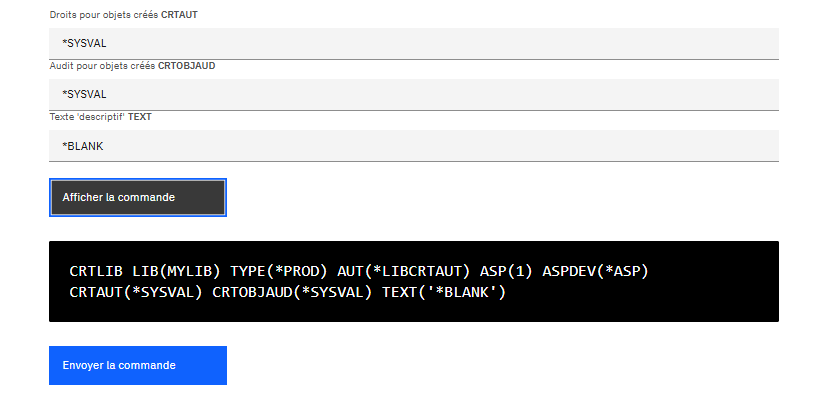
Étape 3 : Construire dynamiquement la commande CL à exécuter
À ce stade, tous les champs de l’interface ont été renseignés, et leurs valeurs sont stockées dans les dictionnaires internes (CommandValues, QualifierValues, ElementValues, etc.).
L’objectif est maintenant de reconstruire dynamiquement la syntaxe complète de la commande CL, à partir des données collectées, sous forme de chaîne prête à être exécutée côté IBM i.
Cette logique d'implémentation est centralisée dans une méthode dédiée : BuildCommandCL():
string BuildCommandCL()
{
    var commandCl = SelectedCommand.CommandName.ToUpperInvariant().Trim() + " ";
    foreach (var param in SelectedCommand.Parameters)
    {
        if (!string.IsNullOrWhiteSpace(CommandValues[param.Kwd]))
        {
            string value = CommandValues[param.Kwd].ToUpperInvariant().Trim();
            if (param.Kwd.Equals("TEXT", StringComparison.OrdinalIgnoreCase))
            {
                value = $"'{value}'"; // Le champ TEXT est entre quotes
            }
            commandCl += $"{param.Kwd.ToUpperInvariant()}({value}) ";
        }
        else
        {
            var segment = new List();

            // Éléments imbriqués (ELEM)
            if (ElementValues.TryGetValue(param.Kwd, out var elements))
            {
                var values = elements.Values.Where(v => !string.IsNullOrWhiteSpace(v))
                                            .Select(v => v.ToUpperInvariant().Trim()).ToList();
                if (values.Any())
                {
                    segment.Add($"{param.Kwd.ToUpperInvariant()}({string.Join(" ", values)})");
                }
            }

            // Paramètres qualifiés (QUAL)
            if (QualifierValues.TryGetValue(param.Kwd, out var qualifiers) &&
                QualifierCustom.TryGetValue(param.Kwd, out var customQualifiers))
            {
                var values = qualifiers.Keys.Select(key => !string.IsNullOrWhiteSpace(customQualifiers[key])
                                                           ? customQualifiers[key]
                                                           : qualifiers[key])
                                             .Where(v => !string.IsNullOrWhiteSpace(v)).ToList();

                if ((param.Kwd == "FILE" || param.Kwd == "SRCFILE") && values.Count < 2)
                {
                    // Ne rien générer si l’un des éléments est manquant
                }
                else if (values.Any())
                {
                    var combined = string.Join("/", values.AsEnumerable().Reverse());
                    segment.Add($"{param.Kwd.ToUpperInvariant()}({combined.ToUpperInvariant().Trim()})");
                }
            }

            // Sélections multiples (checkbox)
            if (CheckedValues.TryGetValue(param.Kwd, out var checkDict))
            {
                var checkedValues = checkDict.Where(x => x.Value).Select(x => x.Key.ToUpperInvariant().Trim());
                if (checkedValues.Any())
                {
                    segment.Add($"{param.Kwd.ToUpperInvariant()}({string.Join(",", checkedValues)})");
                }
            }

            if (segment.Any())
            {
                commandCl += string.Join(" ", segment) + " ";
            }
        }
    }
    return commandCl.Trim();
}
On initialise la commande finale en partant du nom principal (DLTLIB, CRTLIB, etc.), suivi d'une suite de paramètres formatés dynamiquement en fonction de leur type. Pour chaque paramètre, plusieurs cas sont traités.
- Si une valeur simple est saisie
CommandValues, elle est ajoutée directement, avec un traitement particulier pour le paramètreTEXT(entouré de quotes simples). - Si aucun champ simple n'est renseigné, on analyse les structures secondaires
- Pour les paramètres imbriqués de type
ELEM, on assemble les sous-valeurs en les séparant par un espace. - Pour les paramètres qualifiés
QUAL, on combine les sous-valeurs (ex. fichier/bibliothèque), en tenant compte des éventuelles saisies manuelles (override). On évite d’ajouter le paramètre si une partie est manquante (notamment pour des couples critiques comme FILE). - Pour les valeurs multiples
checkbox, toutes les options sélectionnées sont concaténées avec une virgule, comme dans OPTION(*SRC, *MBR).
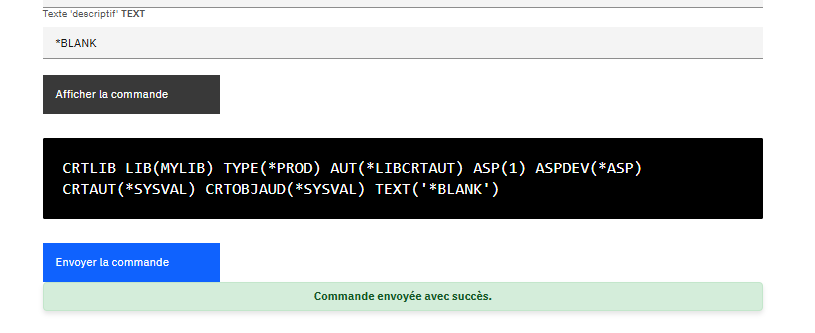
Chaque segment est converti en majuscule, nettoyé, puis concaténé à la commande principale. Le résultat final est une commande CL complète, propre, conforme et exécutable côté IBM i — exactement comme si elle avait été saisie dans un terminal 5250, mais ici, générée dynamiquement depuis une interface moderne.
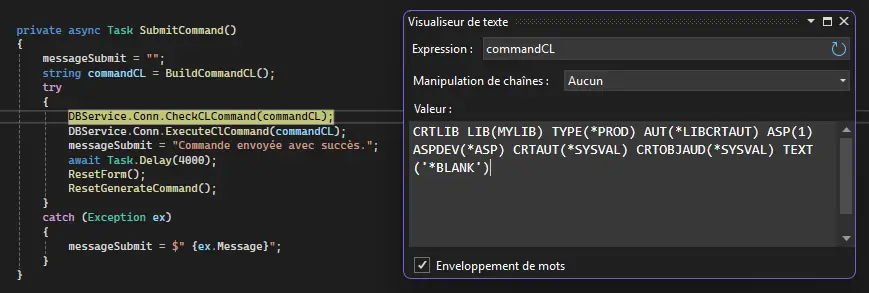
Étape 4 : Exécuter la commande côté IBM i
Une fois la commande construite (voir étape 3), il ne reste plus qu’à l’exécuter sur l'IBM i. Cette étape se déroule en deux temps: une vérification préalable de la syntaxe, suivie de l'exécution effective de la commande.
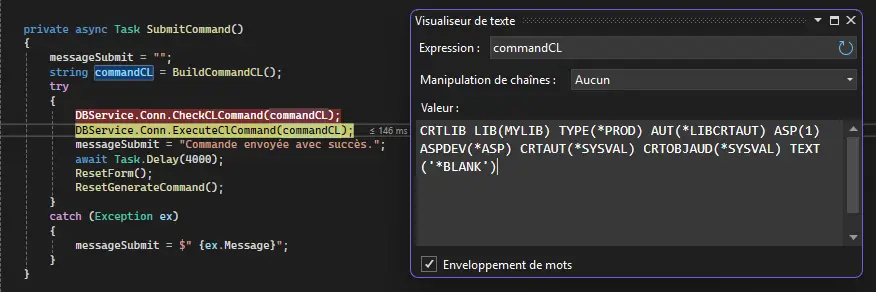
Tout se passe dans une méthode SubmitCommand() appelée lors de la soumission du formulaire Blazor :
private async Task SubmitCommand()
{
    messageSubmit = "";
    string commandCL = BuildCommandCL();
    try
    {
        DBService.Conn.CheckCLCommand(commandCL); // Vérifie la syntaxe sans exécuter
        DBService.Conn.ExecuteClCommand(commandCL); // Exécute la commande
        messageSubmit = "Commande envoyée avec succès.";

        await Task.Delay(4000); // Pause avant réinitialisation
        ResetForm();            // Vide le formulaire
        ResetGenerateCommand(); // Vide la commande affichée
    }
    catch (Exception ex)
    {
        messageSubmit = $"{ex.Message}";
    }
}
1️⃣ Vérification préalable avec CheckCLCommand()
Avant tout envoi, il faut pouvoir valider la commande générée. On vérifie cela via la méthode CheckCLCommand(), exposée et disponible elle aussi via l'extension Toolbox de NTi.
Elle interroge l'IBM i pour analyser la validité syntaxique complète de la commande, sans l'exécuter: mots-clés inconnus, valeur mal formatée, paramètre obligatoire manquant.
Ce contrôle anticipé évite les erreurs à chaud, en reproduisant exactement le même comportement que le système en environnement 5250.
2️⃣ Exécution avec ExecuteClCommand()
Une fois validée, la commande est transmise via ExecuteClCommand(), méthode exposée par la classe NTiConnection de NTi DataProvider.
Elle est exécutée dans la session déjà ouverte — avec son environnement complet : utilisateur, job actif, bibliothèque courante, autorisations.
Tous les messages de retour ou erreurs système sont restitués comme si la commande avait été lancée directement depuis un terminal IBM i.
Ce qui est controlé côté Blazor/.NET
L'intégralité du processus est maitrisé dans l'application .NET. Elle orchestre:
- La génération dynamique de la commande CL avec
BuildCommandCL(), à partir des valeurs saisies dans l’interface. - La validation syntaxique grâce avec
CheckCLCommand(), qui simule le comportement du système sans lancer réellement la commande. - L’exécution réelle avec
ExecuteClCommand(), dans le contexte de session IBM i (job, utilisateur, bibliothèque courante). - La gestion des erreurs et messages via un bloc try/catch, pour restituer à l’utilisateur les retours du système IBM i.
La commande s'est bien executé, et nous affiche le message de succès
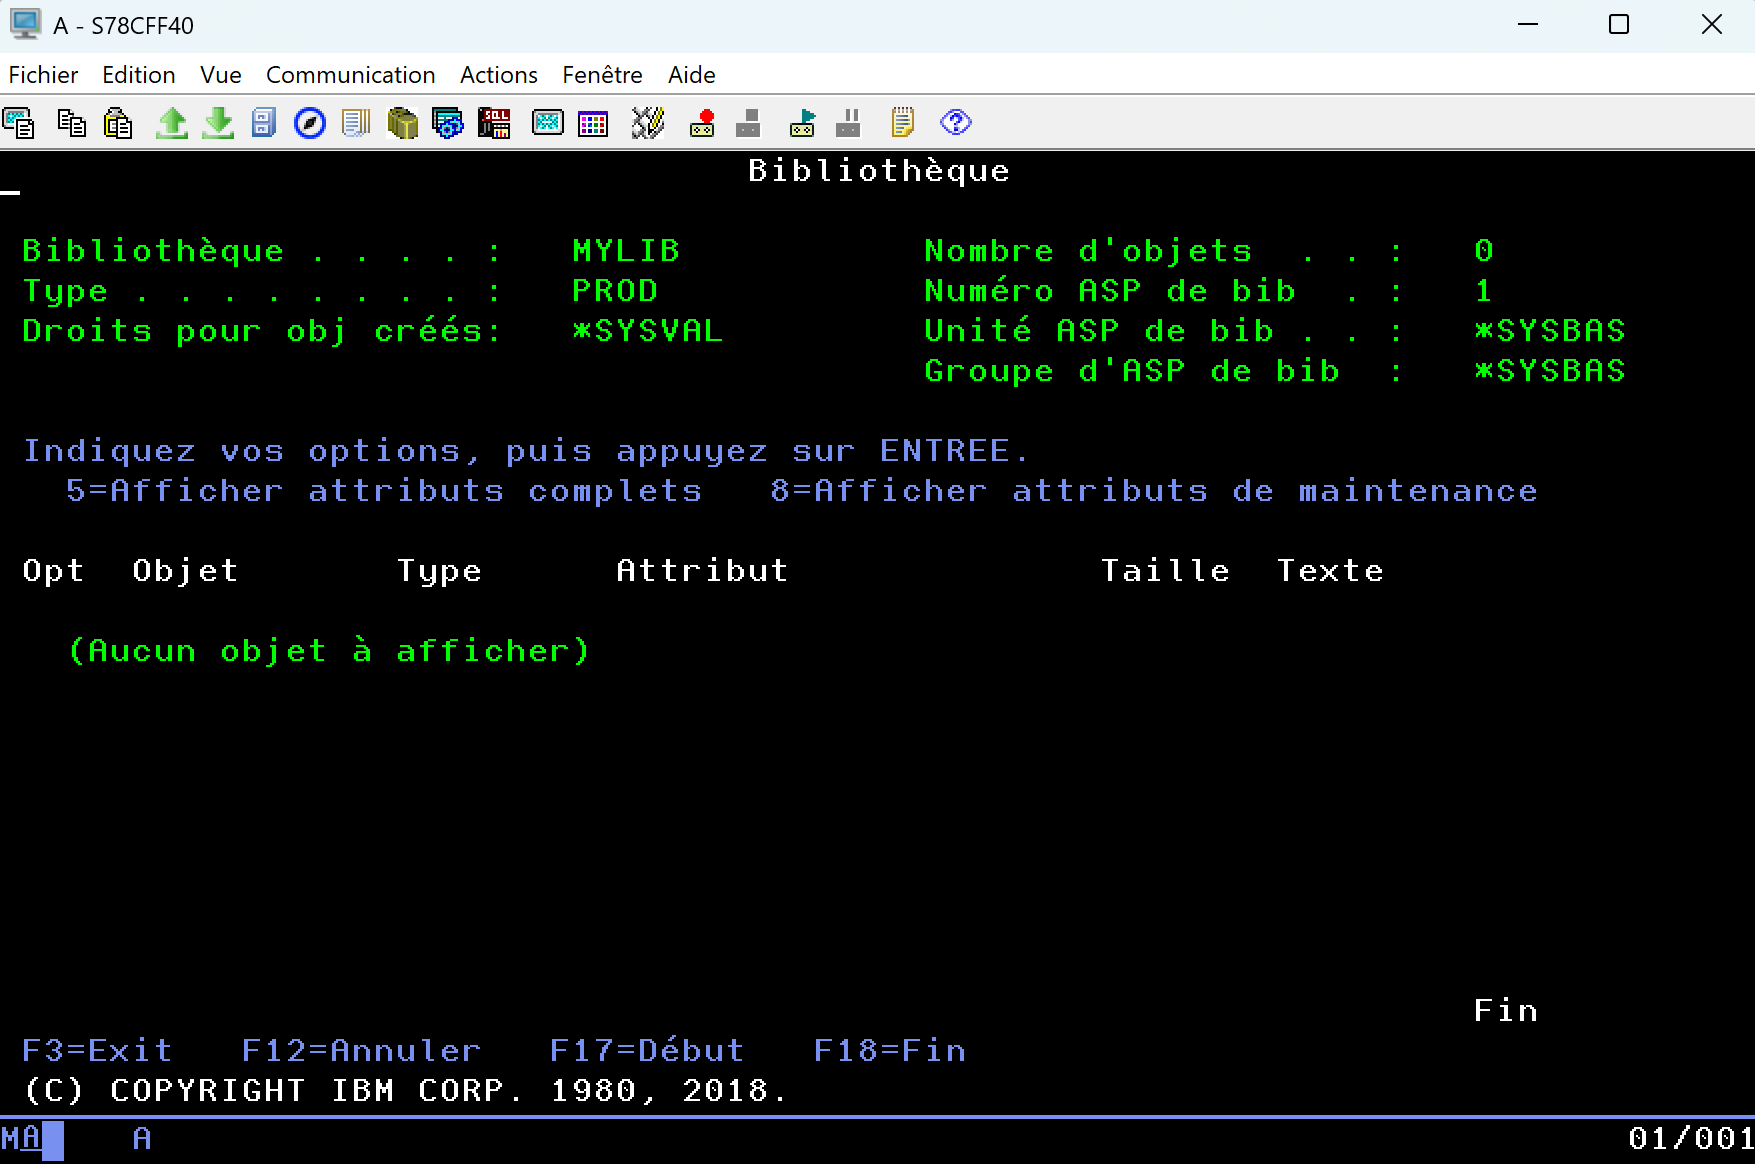
Et la librairie est bien crée sur notre IBM i
Conclusion
Avec RetrieveCommandDefinition() et RetrieveCommandDefinitionXml(), proposés par ToolboxExtension, vous pouvez générer dynamiquement des interfaces de saisie pour n'importe quelle commande CL, simplement en vous appuyant sur les métadonnées renvoyées par l'API QCDRCMDD.
RetrieveCommandDefinition() encapsule entièrement ce processus coté .NET: elle interroge l'API IBM i, récupère le flux XML au format CDML, le décode et le déserialise un objet fortement typé C#. Aucun parsing manuel ou manipulation de XML n'est nécessaire. Toute la structure de la commande (paramètres, types, valeurs, dépendances...) est est immédiatement disponible et exploitable dans votre code.
Cette abstraction réduit considérablement la charge de travail côté développement, permettant ainsi de se concentrer uniquement sur l’UX et la logique métier, sans jamais coder manuellement la structure de chaque commande.
Mais surtout, vous sortez enfin du cadre figé d'un terminal 5250. Votre interface devient portable, accessible depuis un navigateur, une application métier, un poste client ou une plateforme conteneurisée. En d'autre terme, ce changement d'approche ouvre à la voie a de véritables nouveaux usages:
- Formulaires simplifiés pour les équipes non spécialisées IBM i
- Centralisation de commandes dans un portail d’administration
- Intégration dans des workflows DevOps ou des outils de support
- Automatisation de tâches systèmes ou techniques, sans session verte
Vous ne quittez pas l’IBM i — vous l’étendez. Vers le web, vers .NET, vers demain.
Les méthodes Toolbox n'ont pas vocation à remplacer vos compétences IBM i, elles vous libèrent de la complexité technique, et les prolongent dans un nouvel écosystème, plus agile et accessible. Un gain de temps côté développement, et une montée en valeur claire pour vos applicatifs.
Quentin Destrade