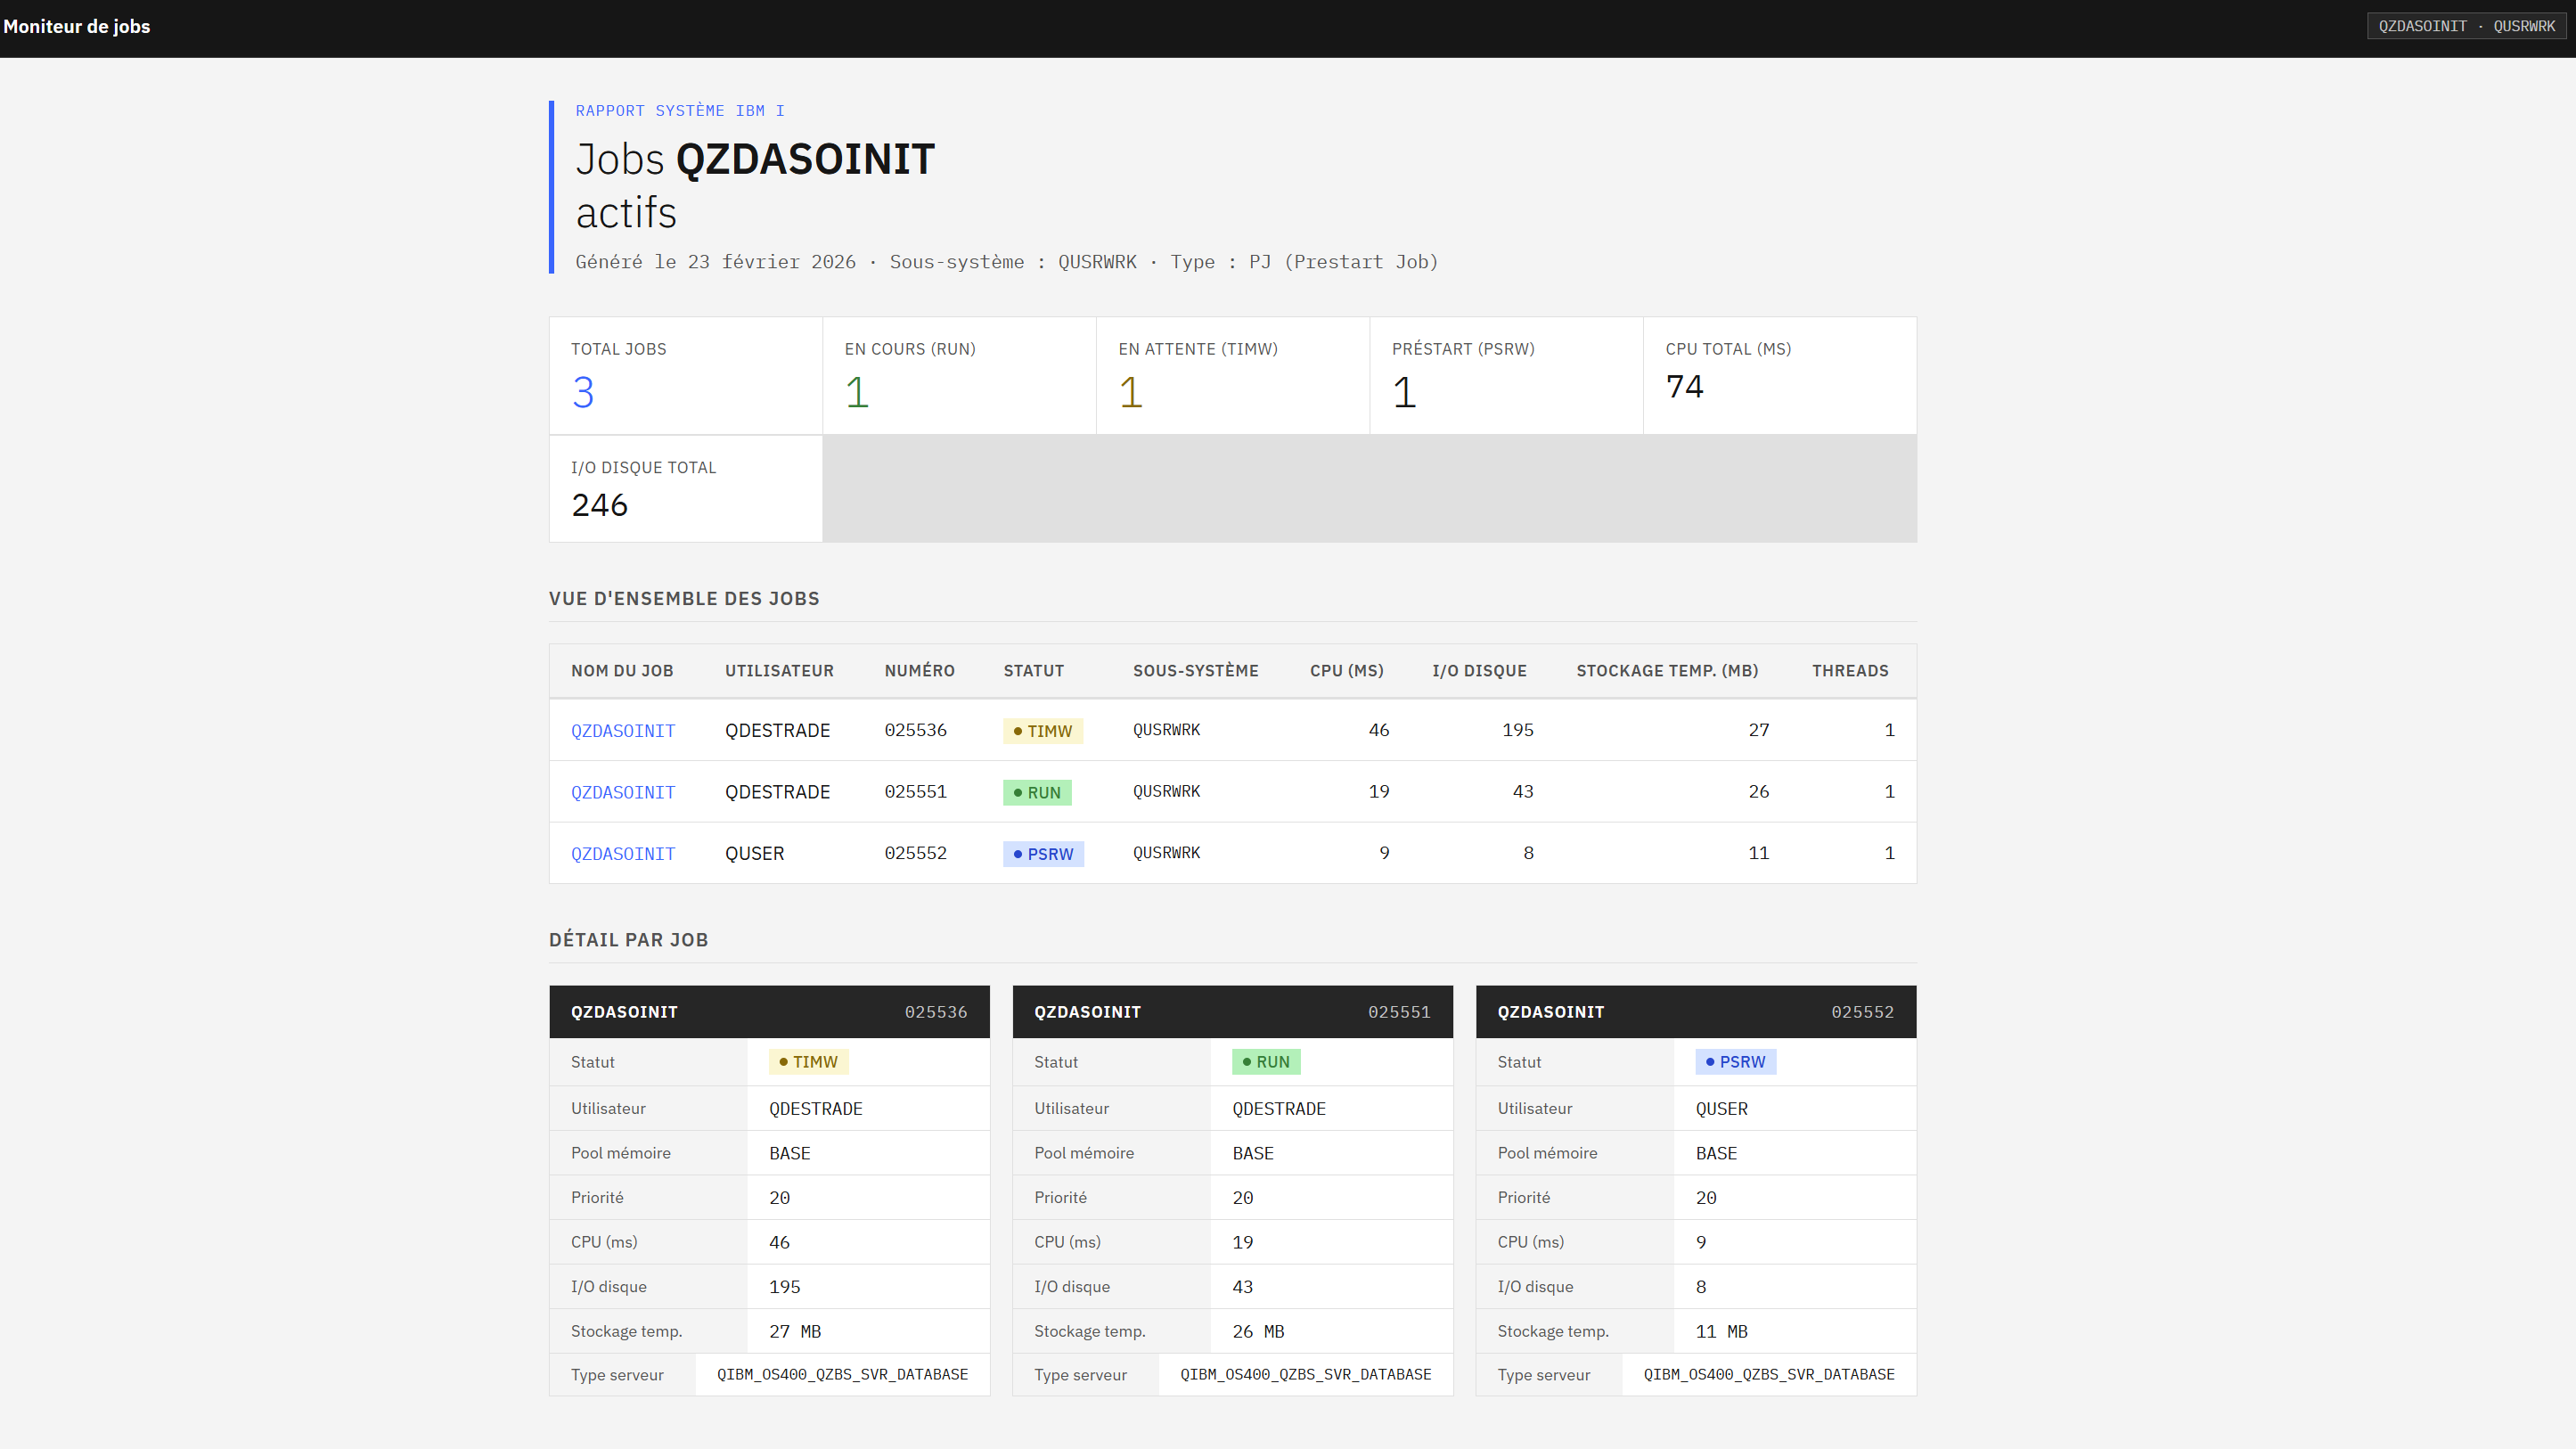
Imagine typing into Claude AI: "Generate a report of QZDASOINIT jobs".
Twenty seconds later, a complete table appears: job summary, color-coded statuses, execution details, real-time data from your IBM i.
Sounds impossible?
Yet that is exactly what we are going to set up with .NET and NTi Data Provider.
This article is part of a series on using an AI agent with IBM i via the Model Context Protocol:
- Create a .NET MCP server to connect IBM i (AS400) to an AI (this article)
- SQL reads and writes on DB2 for i from .NET with an MCP server
- Call an IBM i RPG program from .NET with an AI agent
This article covers:
- Creating an MCP server in .NET 8
- Connecting this server to IBM i via NTi
- Exposing it to Claude Desktop in secure mode (stdio)
- Running a first real-time query
What is the Model Context Protocol (MCP)?
The Model Context Protocol is an open standard, published by Anthropic in 2024, that allows any AI agent to communicate with external data sources: databases, APIs, ERPs, or in this case, an IBM i.
Before this, the AI agent was essentially locked in its own bubble. It could answer general questions, write text, analyze documents, but had no way to fetch data from a third-party system on its own.
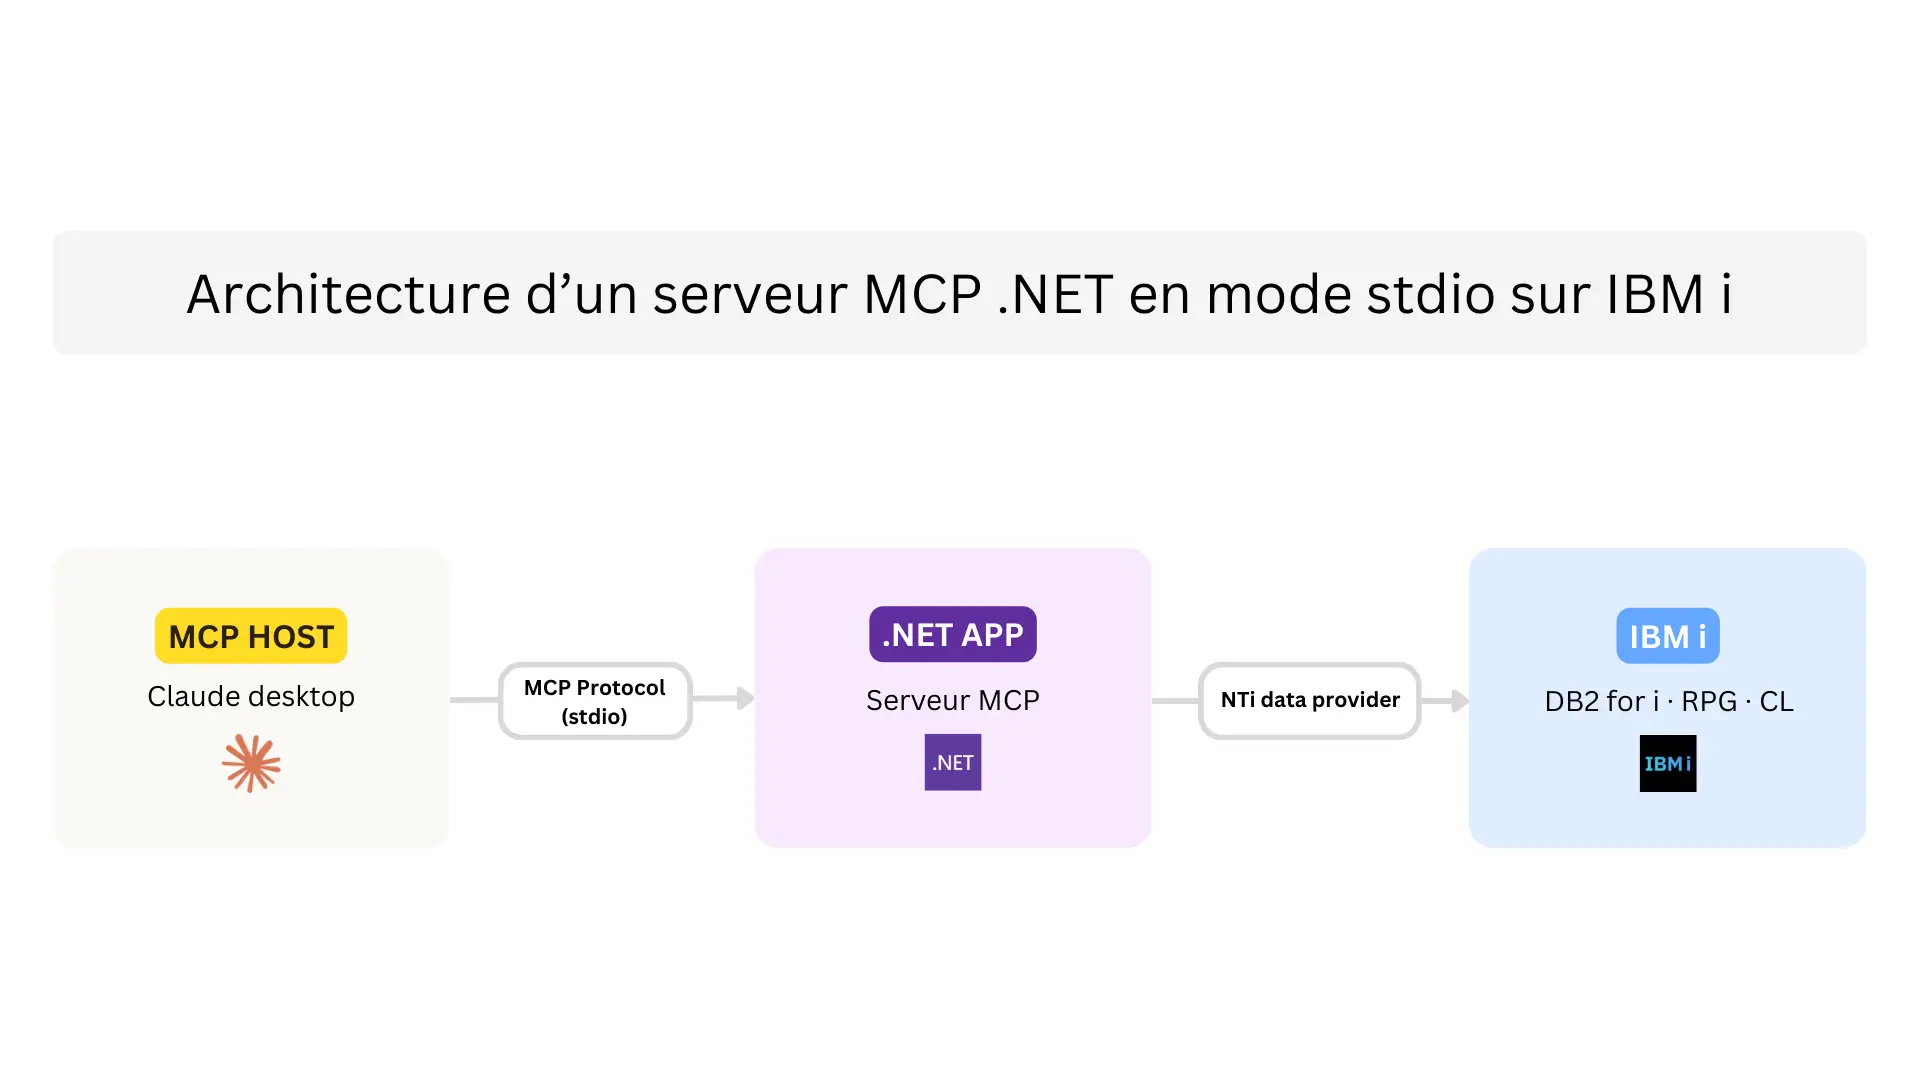
In practice, an MCP server is created in .NET and exposes features as tools. When a question is asked in Claude Desktop, it analyzes the request, identifies the appropriate tool, calls it with the right parameters, retrieves data from IBM i, and responds in natural language.
Nothing to code on the Claude side. Everything happens on the .NET side.
What is remarkable is the simplicity of the setup: a .NET application, the ModelContextProtocol package, NTi for the IBM i connection, Claude Desktop for the AI agent, and the system responds in seconds.
Why connect IBM i to an AI agent?
A user wants to know why a customer order has not been shipped? Instead of navigating through multiple 5250 screens, they ask the question in natural language. Claude queries the orders, statuses and stock tables, and returns a clear summary.
An operations manager notices a slowdown? They ask Claude "What are the most CPU-intensive jobs right now?". The agent queries the QSYS2 system views and returns a table.
A sales manager wants to visualize current month sales trends? They ask "show me daily sales with a comparison against last month". Claude queries DB2 for i, aggregates the data, then generates a dashboard with trend charts and cumulative totals.
In all these cases, the AI agent relies on the tools exposed via the MCP server. Each tool encapsulates a SQL query, an RPG program call or a system view read. Once these access points are correctly defined, Claude can query multiple sources in sequence, process the results and produce a structured summary.
Privacy and security
The MCP server operates in two modes:
- SSE (Server-Sent Events): the server is exposed via HTTP on the network and can be consumed by authorized clients.
- stdio: the server runs locally on the same machine as Claude Desktop, with no network exposure.
The second mode is what is used in this article.
In both cases, data stays within your infrastructure. The MCP server does not transmit anything on its own to the outside. When Claude calls a tool, the returned results are passed to the model to generate the response.
IBM i access is controlled by the NTi configuration. The AI agent has no additional rights, it operates strictly within the permissions of the IBM i profile used for the connection.
Privacy therefore depends on:
- The data exposed via the tools
- The network configuration of the MCP server
- The data processing policies of the model provider being used
Prerequisites
Allow around twenty minutes to get everything set up.
Development side
- .NET 8 SDK or higher
- Visual Studio 2022 or VS Code with the C# extension
IBM i side
- An IBM i connection with a development user (read-only recommended)
- The NTi Data Provider connector: free evaluation license available.
For testing
- Claude Desktop (free): the AI agent that will consume the MCP server.
Step 1 - Set up the project
Create the project from the terminal:
dotnet new console -n NTiMcpServer -f net8.0
cd NTiMcpServer
Add the required packages:
dotnet add package Aumerial.Data.Nti
dotnet add package ModelContextProtocol --prerelease
dotnet add package Microsoft.Extensions.Hosting
dotnet add package Dapper
Step 2 - Configure the MCP server
Open Program.cs and replace its content with the following code:
using Aumerial.Data.Nti;
using NTiMcpServer.Tools;
using Microsoft.Extensions.DependencyInjection;
using Microsoft.Extensions.Hosting;
using Microsoft.Extensions.Logging;
using ModelContextProtocol;

var builder = Host.CreateApplicationBuilder(args);

builder.Logging.AddConsole(o => o.LogToStandardErrorThreshold = LogLevel.Trace);

builder.Services
    .AddSingleton(new NTiConnection("server=***;user=***;password=***;"))
    .AddMcpServer()
    .WithStdioServerTransport()
    .WithTools();

await builder.Build().RunAsync();
Replace the connection string values (server, user, password) with your IBM i credentials.
It is recommended to use a dedicated profile with limited rights for testing.
Step 3 - First tool: AdminTools
Create a Tools folder in the project, then add an AdminTools.cs file:
using Aumerial.Data.Nti;
using Dapper;
using ModelContextProtocol.Server;
using System.ComponentModel;

namespace NTiMcpServer.Tools
{
    public class AdminTools
    {
        private readonly NTiConnection _conn;
        public AdminTools(NTiConnection conn)
        {
            _conn = conn;
        }

        [McpServerTool]
        [Description("Liste les jobs QZDASOINIT actifs sur l'IBM i")]
        public IEnumerable GetActiveJobs()
        {
            return _conn.Query("SELECT * FROM TABLE(QSYS2.ACTIVE_JOB_INFO()) WHERE JOB_NAME LIKE '%QZDASOINIT%'");
        }
    }
}
The dynamic type is used because the exact columns returned by QSYS2.ACTIVE_JOB_INFO are not known in advance.
The [McpServerTool] attribute exposes the method as a tool usable by the AI agent. Any method annotated this way becomes accessible via the MCP protocol. The clearer and more precise the description, the more accurately the agent will select the right tool.
Step 4 - Connect Claude Desktop
Once the code is in place, build and run the server:
dotnet runThe server starts and listens for incoming messages via stdio.
Then open the Claude Desktop configuration file. On Windows, it is located here:
%AppData%\Claude\claude_desktop_config.jsonTo verify that Claude Desktop is correctly installed, several folders and files must be present. If the folder is empty or missing, Claude Desktop is not correctly installed.
dd the following configuration, adjusting the path to your project:
{
  "mcpServers": {
    "ntimcpServer": {
      "command": "dotnet",
      "args": [
        "run",
        "--project",
        "C:\\ABSOLUTE\\PATH\\TO\\PROJECT"
      ]
    }
  }
}
Check the indentation and validity of the JSON before saving. A missing comma or an unclosed brace will prevent Claude Desktop from starting correctly. The file can be validated at jsonlint.com.
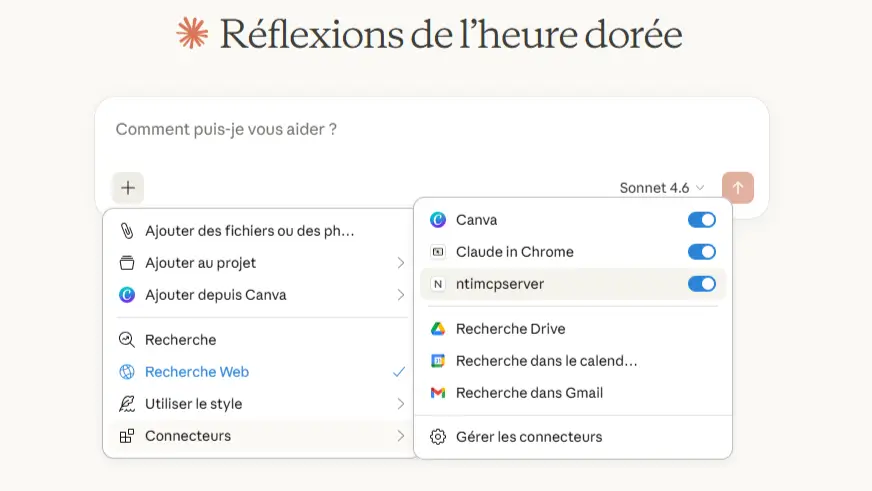
Save the file and restart Claude Desktop. To verify that the server is detected, click the "+" icon at the bottom of the conversation window, then hover over Connectors. The ntimcpserver server should appear in the list.
Step 5 - First test
The server is connected and IBM i is accessible. Open a new conversation in Claude Desktop and ask for example:
"List the active jobs on IBM i and display the result using IBM's Carbon Design System."
Claude calls the GetActiveJobs tool, retrieves data from IBM i, and generates an HTML render formatted with the Carbon Design System.
A free 30-day evaluation license is available, sufficient to reproduce all the examples presented in this series.
Quentin Destrade